So many of us have a stack of old t-shirts on hand that we just can't get rid of. Put those shirts to good use! We're going to show you how to make a t shirt quilt out of your old shirts.
Why do you need a t shirt quilt?
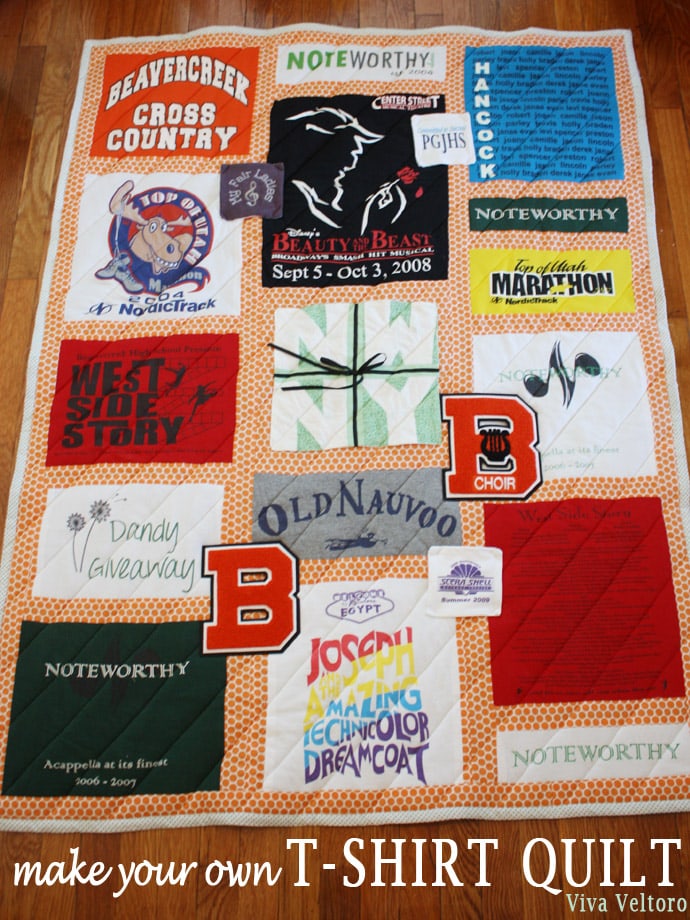
If you went to high school or college, you probably have a big pile of memories that you aren't wearing anymore, but you just can't bear to throw out! I had a huge stack of things I wanted to take with me to college, but my pile of 20 t-shirts wasn't going to make the cut, so that summer before school, I made a t-shirt quilt for my dorm! I've LOVED having it with me as a conversation starter and as a way to remember my friends and my roots, and even now that I'm married, when the temperature drops, we still pull it out to cover our bed. I turned out huge! It can certainly cover the top of a queen size bed. Since then, I've been adding more shirts to another pile from my college activities and a few more high school stragglers. I thought the stack would make just enough for a "crib size" quilt, so I'm excited to show you how to make your own t-shirt quilt! We're including some Amazon affiliate links to show you which products to use, or you can find them at your local craft store.
How to make aT shirt quilt
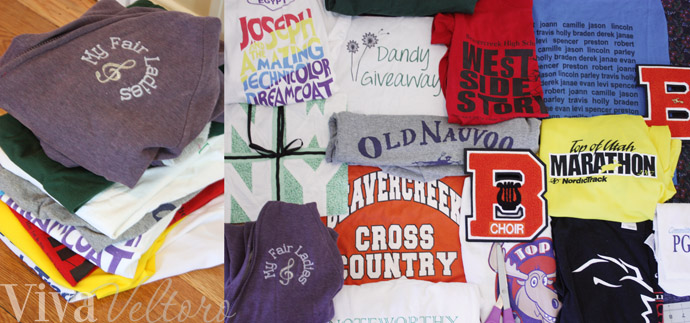
The first step is to round up watch you've got! Don't disregard jackets, t-shirts with only pocket logos, sweatshirts, printed canvas bags, or even varsity letters. You can use all your memories!
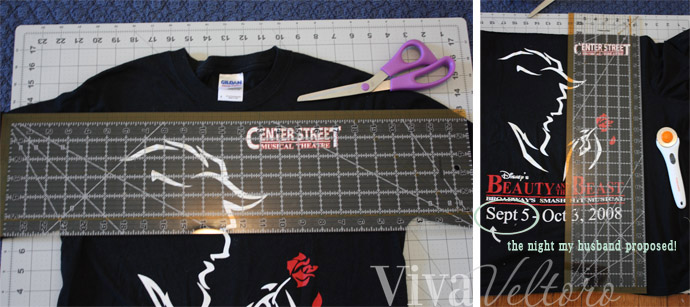
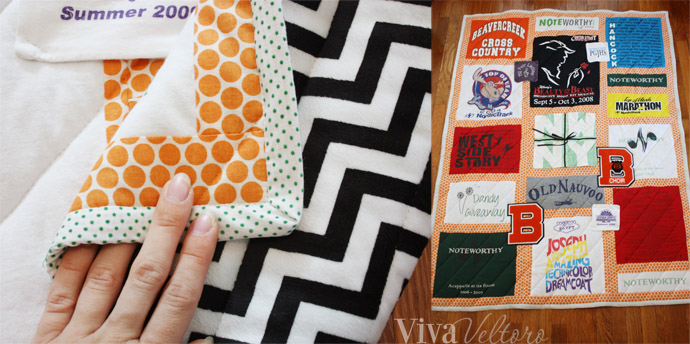
The next step is to get a good even quilt square out of your articles. Start by trimming just where the neckline ribbing ends to get as big of a square (or rectangle) as possible. You can always trim these down later, but for now, save as much as you can on all sides. Using a rotary cutter on a self-healing mat is an excellent way to ensure right angles and see what you're doing along the way.
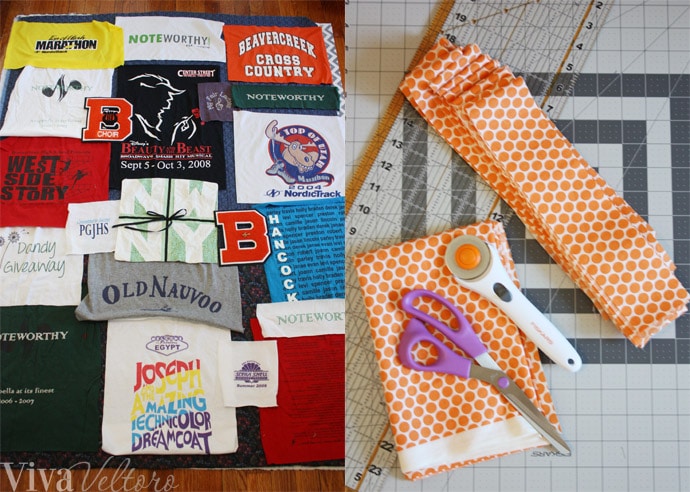
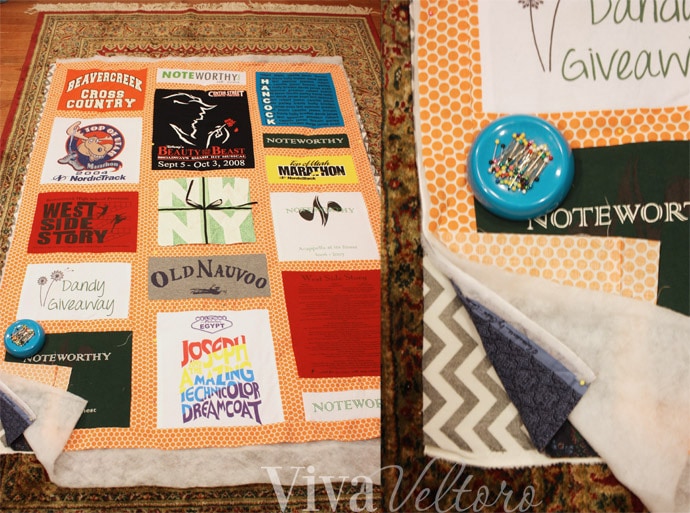
Next, you can lay out your pieces and arrange them how you'd like on the floor. Generally, I tried to arrange them by width, but any fashion will work. I laid out my backing so I knew how much space I could spread, or how much I needed to condense. For the "filler" fabric (the orange polka dot print), I cut strips 2.5" wide and started connecting shirt pieces.
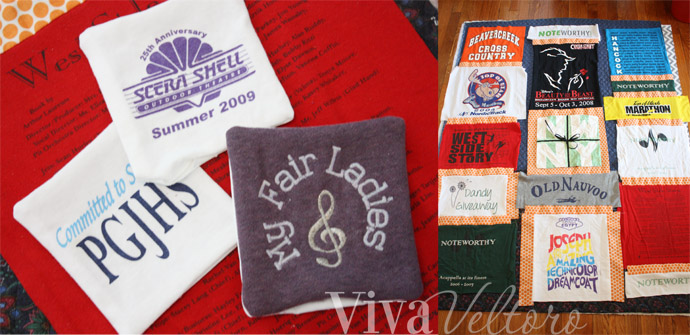
For pocket square logos, I made them into bean bags with some extra muslin behind them. Hand sew them shut, or edge stitch around all four sides to seal them up. We'll add them at the very end. Now above, you'll notice that the "Dandy Giveaway" shirt and the "Joseph and the Amazing..." shirt were not wide enough to create an even strip, so I added some filler fabric on the sides. This way, the entire strip of 5-6 shirts could be trimmed to the same width of 18 inches or so. Then you can join the three strips with some filler that goes the whole length of the quilt, from top to bottom.
At this point, you'll have your entire quilt top done, and its time to put it all together.
*Huge disclaimer: I am not a quilter, and I don't even really enjoy this part! At all! If you ARE a quilter, stop reading, or try not to vomit as I explain how to do this in a very amateur way!
A real quilter would have quilting frames to pull and stretch everything tight and even, but this is the quick and dirty way of getting by. Basically, I get all my layers together, match them all evenly in one corner, and start pinning all the way down and over until everything looks well secured. I have the quilt top, then a basic roll of batting (this is called crib size at 45" by 60"), then an extra blue layer of pre-quilted fabric to add some bulk that is not at all essential, and then the chevron backing. Pin like a maniac. Sometimes I use quilting safety pins so that I know it'll really stay secure while I'm quilting, and I know some people say to pin as close as every 3" through the entire quilt!
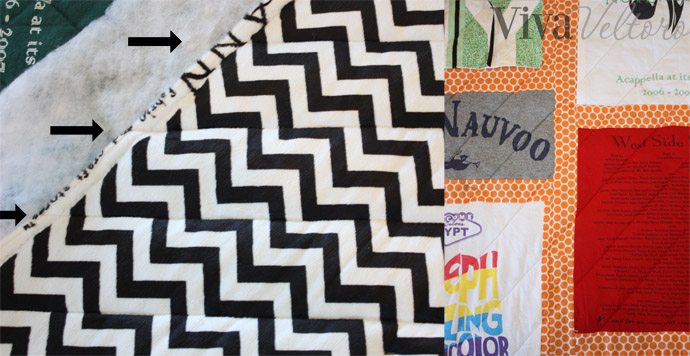
Ok, here's another 'quick and dirty' trick of mine. I always try to find a geometric print to use for the backing. With a repeating print, like this chevron, it is easy as pie to follow the lines, or rows, or repeating shapes so that you don't have to mark anything with chalk or disappearing ink, or guess where you're quilting. Can you see where the black arrows are pointing? Sure, you can get as fancy as you want and try to sew fun shapes or loops, but by this point, I just want the quilt done! Unpin as you go and try not to get frustrated! I always start in the middle and work out, so that the pieces aren't horribly skewed by the ends.
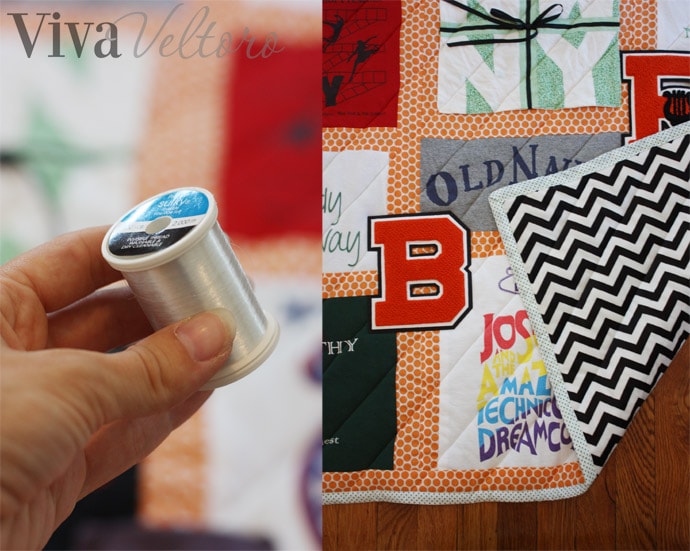
I use a clear thread for the top and bottom, and when everything is quilted, surge the four sides. Then you can bind it however you'd like. I basically made my own double fold bias tape, which you can find at any craft store or on Amazon. Another tip: look up how to do a "mitered corner" if you like the look of these corners. Super easy to do. This is the quilt before it gets its first wash, which will create some lovely wrinkling in just the right places to make it look more 'quilty'.
Now you can add on the details, like the pocket squares, varsity letters, and other trinkets like Prom Queen sashes, school spirit scarves, or even your graduation hat and tassel! Enjoy having your memories displayed!
I hope you've enjoyed this tutorial on how to make a t shirt quilt! If you make one, we'd LOVE to see it! Be sure to tag us on social media (@vivaveltoro) so we can see it.

If you're looking for other great sewing tutorials, we've got you covered! Check out our popular sewing projects: sew a circle skirt for babies, how to make pacifier clips, DIY flat iron holder, how to make a makeup brush roll, how to make a tooth fairy pillow, and how to make hanging kitchen towels.
Cami says
This is ThThis is such a great idea! My husband has a pile of old shirts with "sentimental" value and this would be prfect!
Camille says
And it would make such a great Christmas gift for him!!
Rachel C says
I've always wanted to do this! I was thinking this would be great for my husband too, for all his firefighting shirts.
I love the polka dot fabric you used 🙂
MonaG says
I love this idea! I wouldn't have the heart to make one(in my case, have one made b/c I'm not a seamstress by any stretch of the imagination) out of presentable t-shirts(not ripped/frayed). Hubby and I have many t-shirts which are well-worn in spots but will be perfect to use in a quilt project. This is a great way to upcycle.
Whitney says
How did you actually attach the varsity letters and symbols at the end? Did you do applique or something easier?
Camille says
Hi Whitney - I just used my machine and top stitched it down. If the varsity letters are too thick for a heavy duty needle, I'd recommend some hand-stitching, maybe in addition to a double-sided fusible? They sure add a nice touch!
Dotty J Boucher says
I love this idea, and you can make one for your daughter and son who is going off to college also, I think they make a perfect
gift for that special child..
Caroline Driver says
Aw, I wish I'd thought of doing this with all the old tees I grew out of from my trips to America. 🙁
Linda Manns says
This is such an awesome gift idea. I will have to give this a try and see how I do. Thank you so much for sharing this
Stephanie F says
Oh this is so cool. I was thinking to make a quiit with some of the first baby clothes so I can keep them or maybe give it to her when she's bigger. Thank you so much for the tutorial!
Paula Adams says
Have never attempted quilting, but have plenty of old T-shirts to use in a project. My husband would like one with a Denver Broncos theme!
Lisa Garland says
I absolutely love this idea! I have saved my daughters tshirt from vacations since she was small. I wanna make her a quilt out of those.
S. Gabel says
Quilter or not, your quilt is wonderful. Keep up the great work and thanks for your posts.
Melanie says
What type of fabric do you use for your dashing?
Melanie says
Sashing*
Sue E says
I am kicking myself again that I didn’t hold onto some of my old, but classic T- Shirts!! I had mostly Rock Concert T-Shirts. They would have made a fantastic shirt - highlighting the bands that we’ve seen. Some bands that aren’t around anymore or its members have died. The quilt would have been a big bit of history for me! I say again, because when I saw Twilight, Bella’s mom give her that quilt made out of places they have been- that was the first kick I felt. I can identify with the the vomiting part! I am not a quitter either!