
The craft gods smiled down on me and in a miraculous course of events, I was able to get my hands on this pretty little Cricut! At no cost to facilitate this review, I was offered the Cricut Explore so that I can share with you my opinion, and bring you some really fun project ideas over the course of the next few weeks! First, let me share with you my thoughts:
Crafting with the Cricut Explore
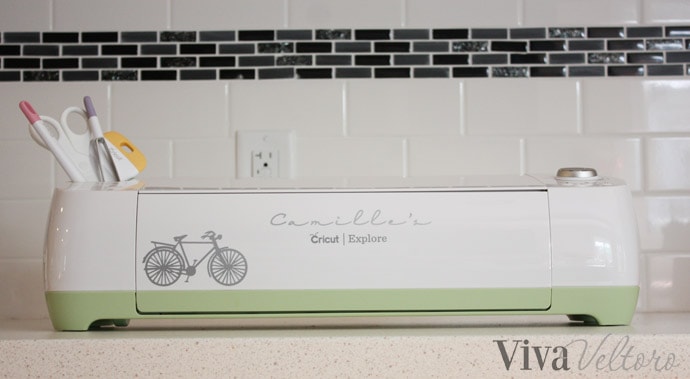
This Cricut is a dream!! What a weapon of mass creation. I was nervous about setting it up because it looks so intense, and something so versatile is bound to be complicated, but once I opened the box, I felt like I was in good hands. There is a friendly "Start Here" packet that is easy to read, minimal, and helpful. Once you open the machine, you'll see three easy steps that guide you to where online you can set everything up. At no point in this process was I ever confused, lost, or overwhelmed, and it doesn't take much time at all. In one evening, I was all set up, and had tackled a few projects.
The design of the machine is well-thought out, and very friendly to women and crafters, with its cheerful colors, fully written out words (no abbreviations), and slick white finish. The shape is easy to lift and the weight is not cumbersome. The only downside I see is the need to have it tethered to the computer when in use. This requires some free desk space, but because it is so boxy and short without needing a lot of width, I think it is manageable for fitting in all sorts of desk spaces.
As I was prompted to go through the first few projects (with supplies provided), I found they were a breeze to complete! Offering a small sampling of a variety of materials and planned projects to try out as you get to know your machine is an excellent move on Cricut's part, since I might not have explored these materials on my own. For example, I would never have thought to use duct tape for a project, but one of the suggested uses for the included duct tape sheets as cupcake toppers just got my mind spinning with other uses.
Using the Cricut design canvas area online when putting together a project is easy to understand, especially if you have Photoshop experience. The layout is pretty intuitive, and I haven't yet run into a snag that wasn't quickly solved in the FAQ help section.
Watching the Cricut at work is magic. I've made many different projects now, and everything is precise and crisp, even from the very first cut. There is no struggling or stalling of the machine, even with tough materials, and everything is so quiet! The precision is really remarkable, and I'm convinced there is nothing this machine can't handle.
The library of shapes and pictures available is extensive, and I haven't yet had a problem finding exactly what I was looking for. The already-made projects and pictures that you can see on the Cricut website are beautifully done, inspirational, and even addicting. They really help the creative juices flow. My favorite part of this cutting machine is the ability to make completely customized projects. I don't have to fill my home with things I've seen on blogs everywhere else, but with things that are unique to our family, particularly meaningful, or tweaked to be just my style.
My mind is just racing with all the future projects I want to tackle with this Cricut. The sky is the limit with this!
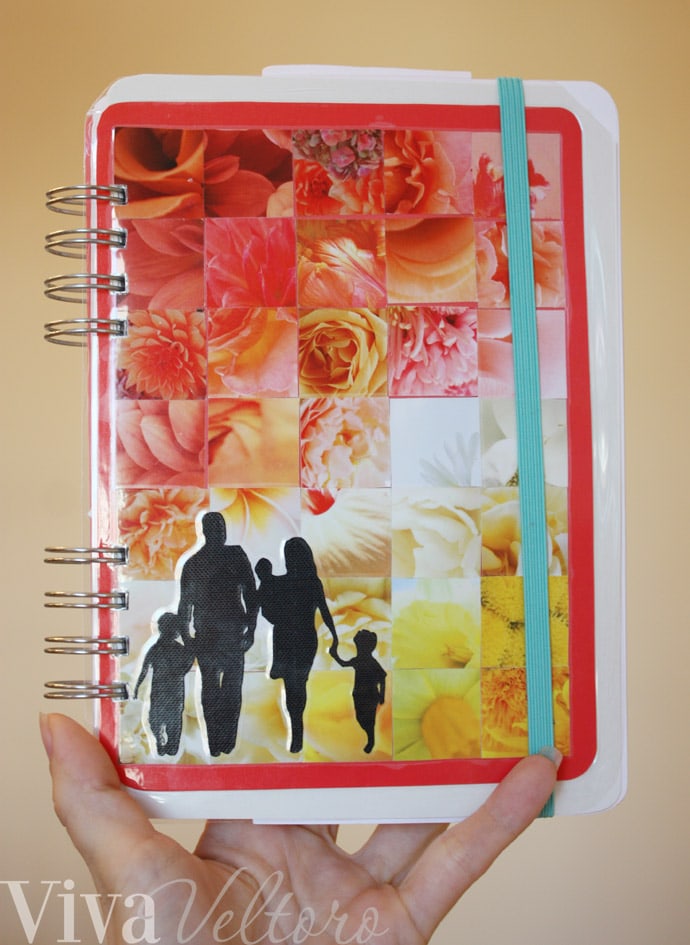
And now its project time!! My favorite part of "back to school", I kid you not, is getting a new yearly planner, and personalizing it with all my dates, events, vacations, and most of all, a new and unique cover. This year, I wanted to make some sort shadow silhouette of our family and incorporate some of the floral pages from last year's Flowers calendar.
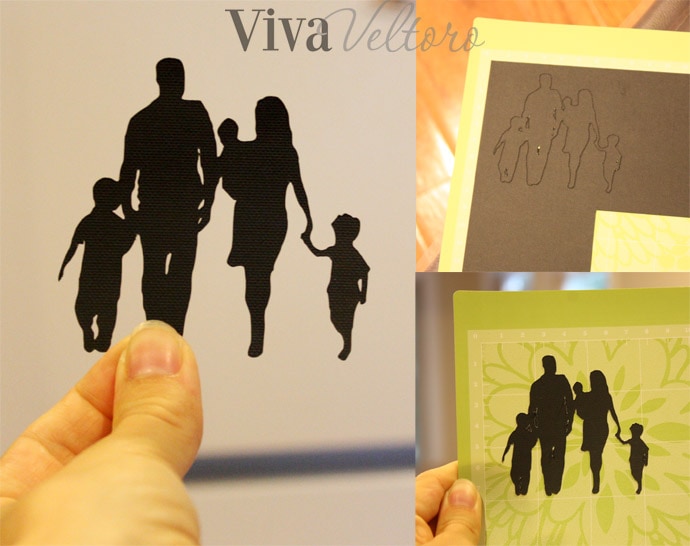
Instead of using a picture of our own (which I'm fully planning on doing for a project down the road!), I started with some shadows I could easily find online.  You can find stock photos like these all over the internet. You can search for "family silhouette" and a million things pop up, most for purchase. I chose a few, then cut and pasted my favorite heads, bodies, and arms from a few different clip arts.

...and came out with something that I think resembles our family quite well!

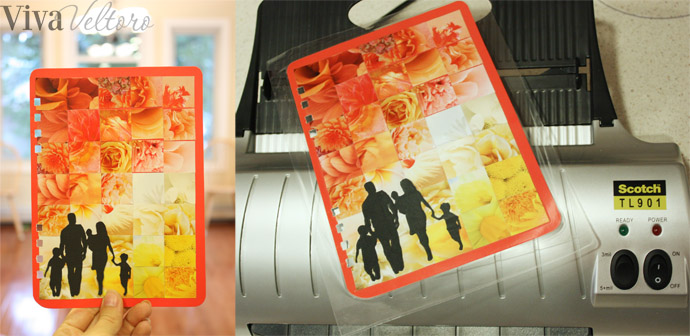
Once I had a collective image, I uploaded the image into a new project canvas, where it created the image to cut. I chose to use a black cardstock, and the image came out crisp as can be!
My favorite planners are from Orange Circle Studio. I took the cover out of the spiral coils, and flipped it over so that I could use the solid coral color on the back.
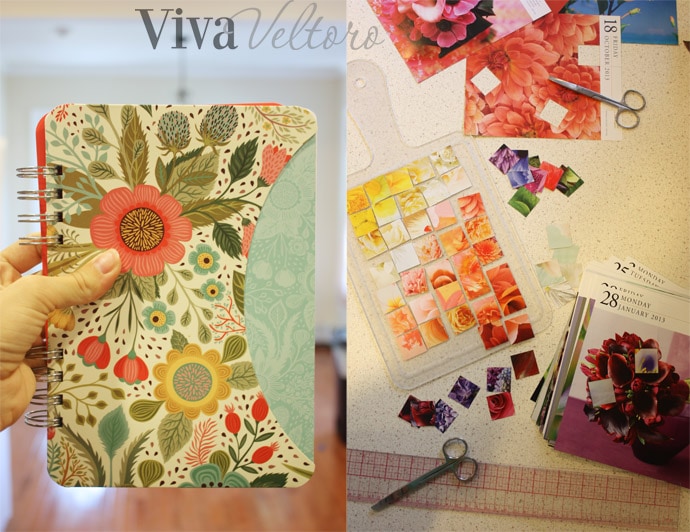
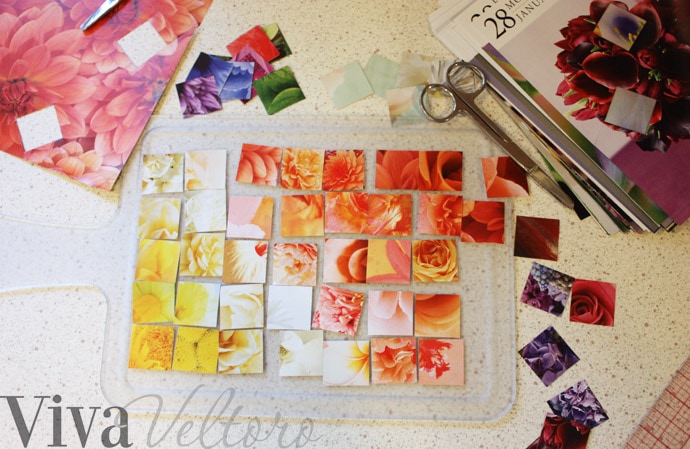
For this collage of floral prints, I cut up 1" by 1" squares from an old Flowers calendar, and arranged them to imitate a sunrise.
I loosely glue-sticked them to the original planner cover, along with my Cricut family silhouette, and ran the whole thing through a laminator. I cut out the holes for the spirals with a small blade, and strung it back onto the planner. Ta-da!
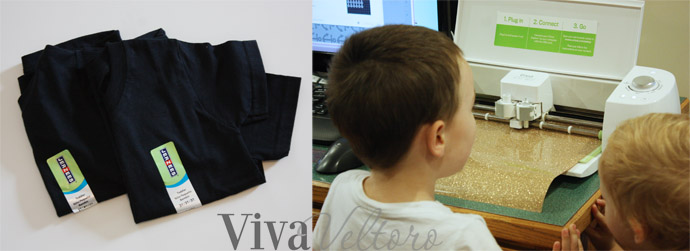
Next up, I made my boy a new shirt for this school year! He is completely obsessed with pirates, and as soon as I told about a "golden anchor" shirt, he could talk about nothing else until it was finished!
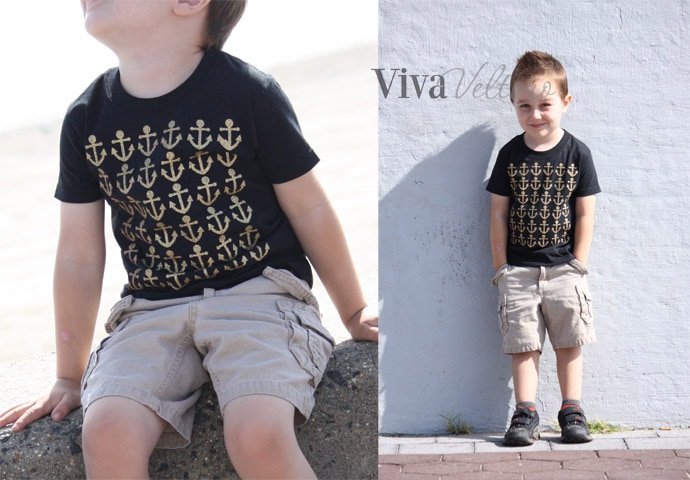
This project took a LOT less creativity, especially since all I had to do was search for "anchor" in the Cricut archives of designs. I found the perfect shape, duplicated it, and welded them all together so that it wouldn't cut them out individually, but as a group of all 36 anchors together.
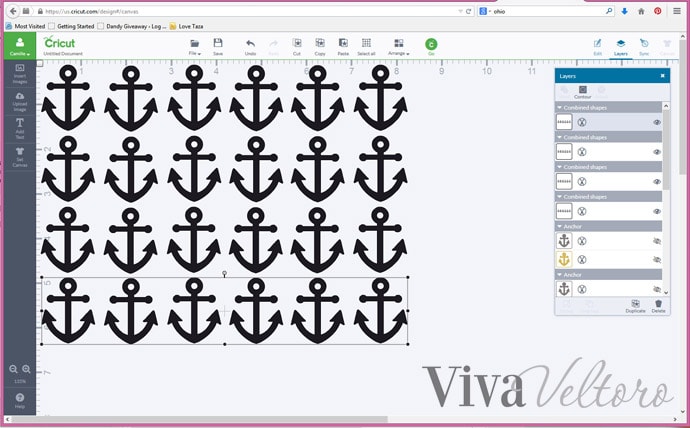
I used a roll of the Cricut Iron-On Glitter 12" x 19" in Gold, and found some toddler size black t-shirts at Joanns. Follow the standard iron-on directions, and this project is a quick one!
*Note that in this picture, the glitter sheet is upside down. To properly cut the iron-on vinyl, the clear shiny side needs to be down. We fixed it 🙂

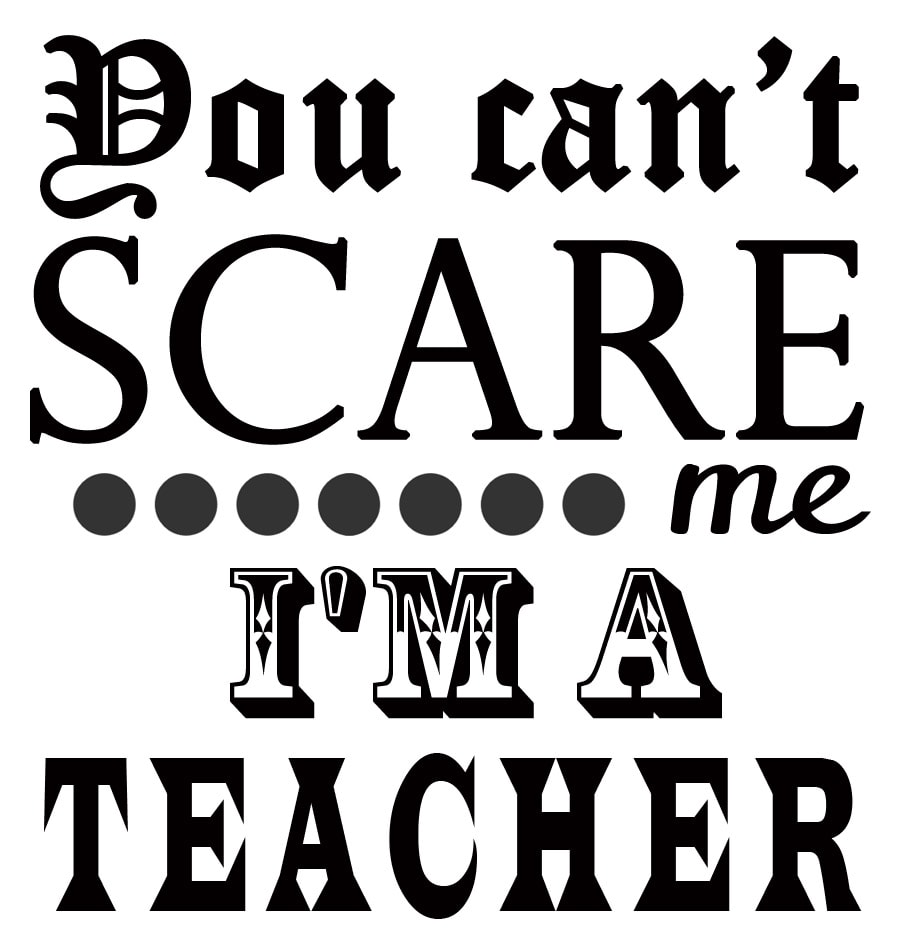
He's so happy! Ok, this last project (for now!) is also a fun one. You could use these for Halloween decor around your house, or give them to teachers as a back-to-school gift!

A lot of these images can be found in the image library. By the way, if this is something you can see yourself getting addicted to, instead of having to buy each image individually, Cricut has some subscription options available where you can have monthly access for $9.99/month. Well worth the cost if you're a project-a-holic.
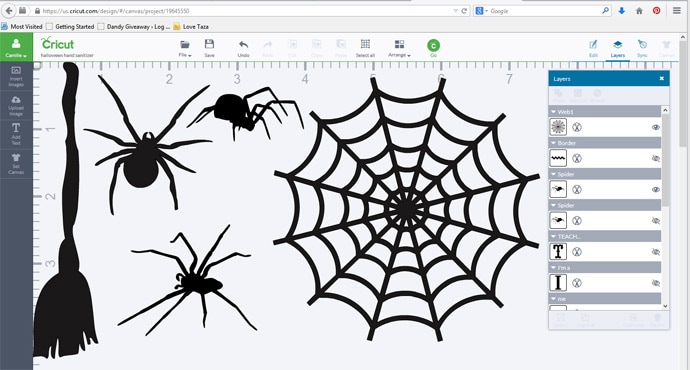
The only image I couldn't find, but wanted, was a witches boot, so I created my own, which you can easily do by uploaded any image, clearing away the background, and importing it into your design space. Feel free to use this boot if you'd like!
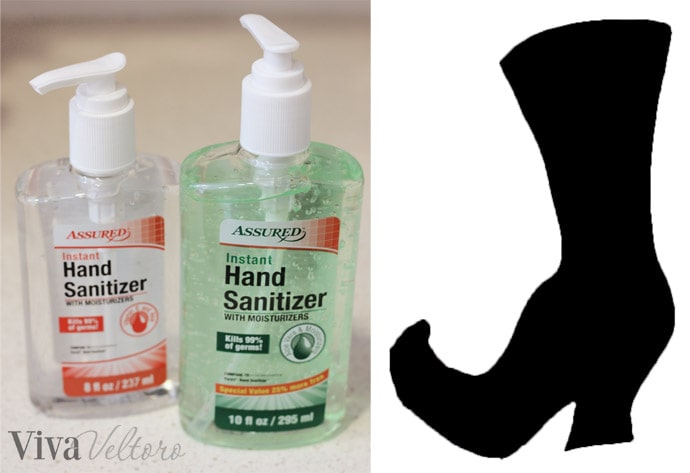
I found these hand sanitizer bottles at the dollar store and peeled off the labels. I especially looked for bottles where the labels could be peeled off easily, instead of printing that would be impossible to remove.
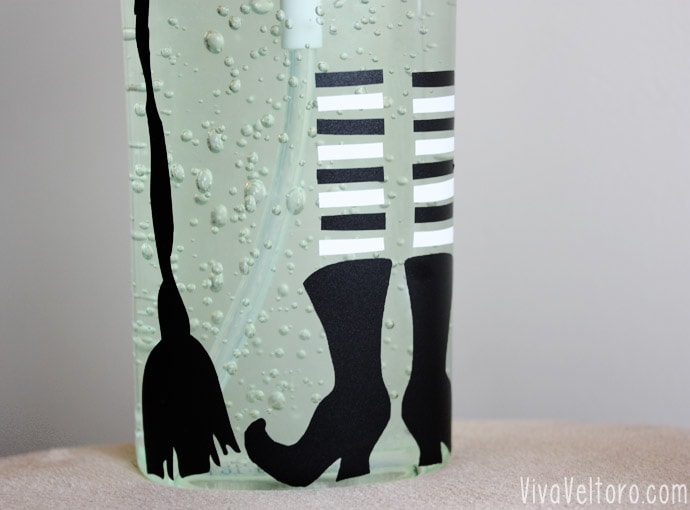
The witch stockings are made from the scraps, and think cutting and placing them just slightly uneven adds character. Finding a sanitizer in a different color really makes this one work. Feel free to use this printable as well!
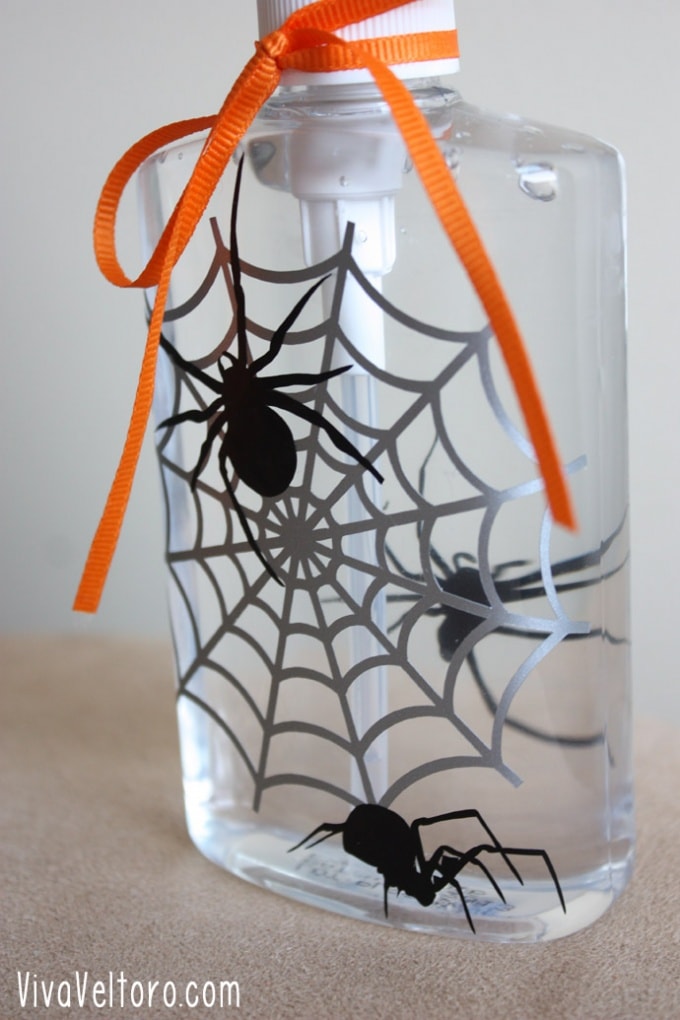
I am so proud of this one! It is so creepy to me! Putting a spider on the back really makes it look more dimensional. And more gross. I can't believe I made this. I hate spiders.
Be sure to check out my other awesome Cricut projects and these Cricut Christmas projects. We've also got some great ideas for crafts to make and sell.
Amazon links are affiliate links.
Courtney Lee says
Finally you are speaking my language Camille! 🙂 As a Cricut Expression owner for 5 years, I have to say you did an AWESOME job! I just used some of that iron on goodness last week and made the same mistake about putting it glitter side up! eek! 🙂 That shirt is so cute! I don't own the Cricut Explore yet but I do have the Silhouette Cameo and love it. Enjoyed this!
Camille says
Oh Courtney, I'm sure the projects you bust out are just inspirational! Thanks for the feedback - let me know your favorite things you've done with your machine sometime! Glad to be in the Cricut club with you 🙂
Rachel C says
Cute projects! Love the hand sanitizer and I'm definitely going to make those for my kids' teachers!
I inherited a Cricut a few months ago and sadly haven't had time to do a whole lot with it yet. I'll have to get to work!
Camille says
Yay, those teachers will love it! When I was a teacher, I loved seasonal and useful things like this for the desk! Have fun!