Do you want to give your bedroom a new look? We'll show you how to make an easy DIY platform bed frame with step-by-step instructions.

How to make a platform bed frame
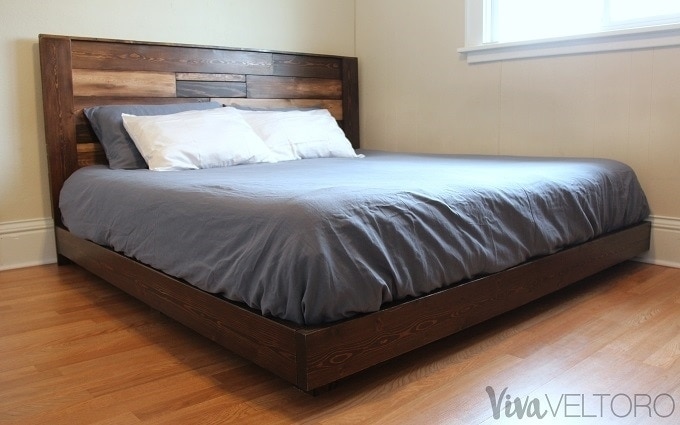
We recently got a new mattress and decided it was time to upgrade from our box springs to an actual bed frame. However, when I started looking at prices for a wooden platform bed (my dream!) I decided it would be much more affordable to make our own. And so began our foray into making an easy DIY platform bed frame!
I honestly didn't know where to start, so I looked on Pinterest for some guidelines. I found this gorgeous bed and thought it would be the perfect starting point for our project. We modified a few things as we planned out our own bed frame, but that was a great guide for us to begin. Our new mattress is 79x75, so we planned our dimensions around that, but you'll want to measure your mattress before you begin. It's essential to note that our mattress is positioned sideways, measuring 79" wide and 75" long. If your mattress will be longer than it is wide, you'll need to switch the dimensions. We did this because we co-sleep and needed a few more inches for the extra bodies in the bed!
DIY Platform Bed Supplies
- 4 - 2x6x8 Pine Boards (outer frame)
- 4- 2x4x8 Pine Studs (inner frame)
- 13- 1x4x8 Pine Boards (slats)
- 1 - 4x4x8 Douglas Fir (legs)
- Box of 2 ½ inch screws
- 1 Quart Rust-Oleum Ultimate Wood Stain (Dark Walnut)(or see other shades)
- 1 Quart Minwax Satin Finish Polyurethane
- Sandpaper- Fine grit for sanding between poly coats, coarser for sanding the outer boards (we used 320 and 220, respectively)
- Wood glue
- 4 Foam Brushes
Other DIY platform bed necessities:
After making a list of supplies, we headed into town. Let me tell you, it's SO fun to pick out perfect wood pieces while your kids are climbing around like they're at a jungle gym (not!). Luckily, we were able to find most of our supplies at one store. We did have to make a special trip for stain, but we loved one specific color, so it was worth the extra stop-Walmart was the only place we could find it locally. Click here for a printable list of supplies and tools you'll need.
Starting the Platform Bed Frame Building Process
A few tips before we get into the instructions. When picking out boards, look for perfectly straight pieces. It took us about an hour to find the lumber for our frame because we didn't want bowed boards or wood with too many large imperfections. Also, don't buy treated wood! You don't want to sleep on that stuff every night.
Make sure you measure your bed to get the correct dimensions, as not all king-sized beds are exactly the same. Our inner frame is 79 inches wide by 75 inches long, and our slats are cut to 79 inches. You could definitely modify it to make a smaller frame, also! Before cutting, double-check your measurements. My husband is great at constructing things, but even he cut one board too short (extra trip to get another board, check!).

Final measurements for all boards:
Thirteen Slats: 79"
One 2x4: 79" (Inner frame footboard)
Three 2x4: 75" (inner frame length and middle support boards)
Two 2x6 (for head and foot of bed): 81 ⅞"
Two 2x6: 76.5"
Eight 4x4 feet: 6"
Cutting the boards
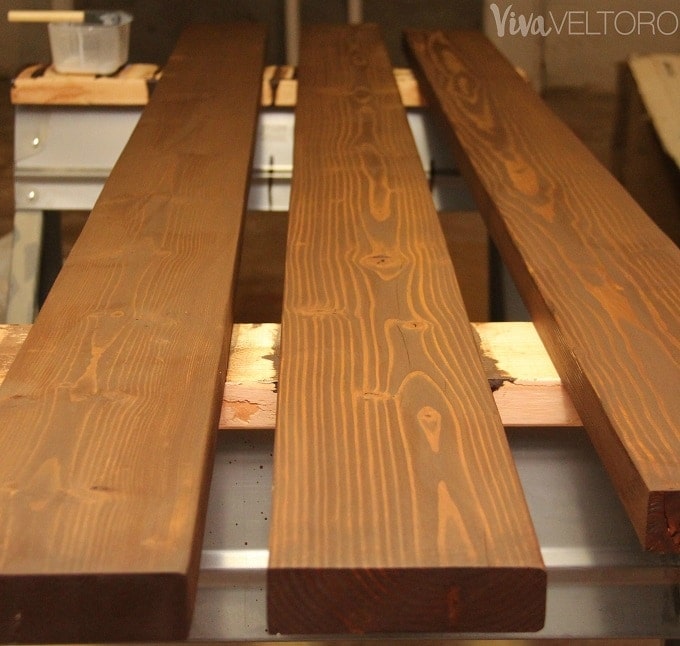
After cutting down the outer frame boards, use a power sander to get rid of any stamping or imperfections. This process took longer than we expected because we bought the cheaper pine boards. If we did it again, I'd shell out the extra cash to get smoother boards! Then cut the inner platform bed frame boards, slats, and legs. If you want to sand the inner frame or legs, you can. My motto is 'work smarter, not harder', so we didn't. The boards we bought for slats were fairly smooth, but we did sand the tops a bit where the mattress will sit.

After sanding the boards (big thanks to my husband for that!) it was time for staining and finishing with polyurethane. Our garage isn't heated so I had to do this in our basement which was not ideal. The ceilings are much lower than a garage ceiling and I wore a mask since it's certainly not well-ventilated. But, it worked fine! I did one coat of stain on each outer 2x6 and the legs and three coats of polyurethane.
You'll have a bit of dry time between coats. I let the stained boards sit for 24 hours before applying the polyurethane. We bought quick-drying poly so I probably could have done a coat every 2-3 hours. However, I waited 24 hours between coats just to make sure we had the best finish possible. My kids are hard on things 😉
DIY Platform Bed Assembly
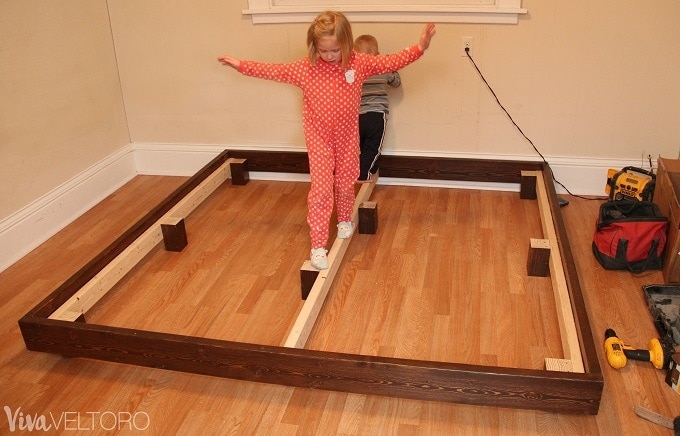
Assembly took less than two hours which I felt was comparable to the time it would take to put together any other bed frame. It went together fairly easily with the assistance of two little helpers!

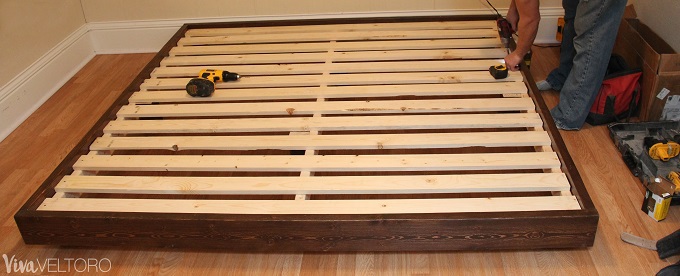
We framed up the inner 2x4s first, and then screwed the legs into those. The legs and 2x4s are flush at the tops.
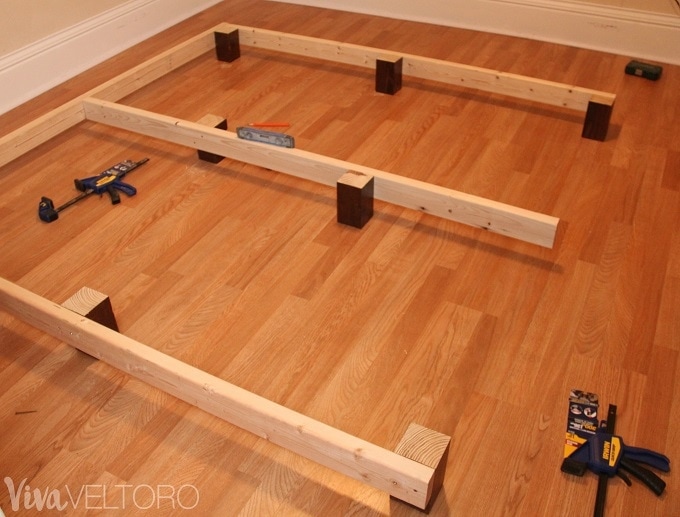
We chose not to have an inner 2x4 at the head of the bed for a couple of reasons. First, we didn't want the platform bed frame to be any farther from the wall than it already was going to be with the 2x6. One of my biggest pet peeves is losing my pillow behind the bed! Second, we didn't feel it would add much for structural support besides weight, so we skipped it.
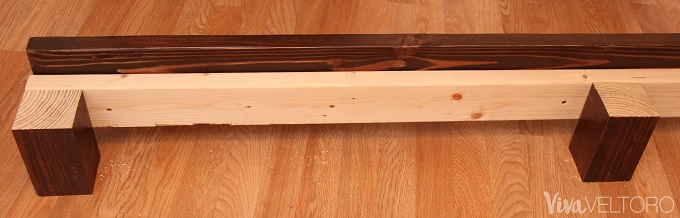
We screwed the 2x6s into the 2x4s with 2 ½ inch screws and the bottoms are flush. The slats sit on top of the 2x4s, but I wanted to show a close-up of this so you could visualize it. We did three screws between each foot, drilling pilot holes so the wood didn't split.
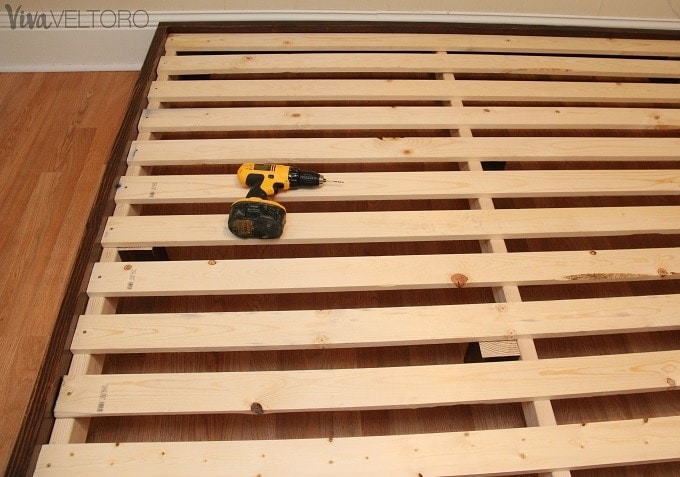
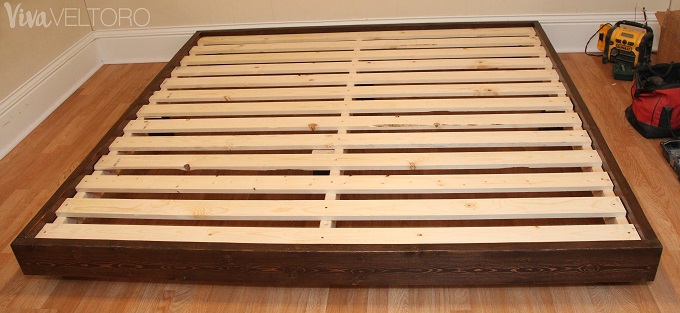
Adding the slats
Our little gymnasts took no time testing out the bed frame before we put the slats in! We chose to keep our slats 2.5" apart. The mattress we were getting recommended no more than 3 inches between slats for support. We laid out the slats, measured 2.5" between them, and screwed them into the 2x4s.
I was so excited to see our things coming together! I haven't done any woodworking since middle school (a LONG time ago!) and I was a little nervous about how things would go. Our DIY platform bed frame really didn't take much time and was WAY more affordable than purchasing a pre-made equivalent.
We spent less than $100 on the wood, stain, polyurethane, and screws. Plus, we have over ½ the cans of stain and polyurethane left for other projects.
After we finished our platform bed frame, we decided to make a headboard too! Check out our tutorial for our DIY wooden headboard, which cost less than $50 to make.
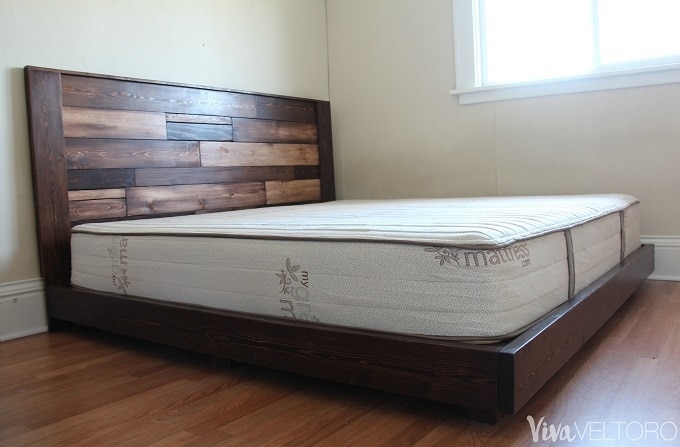
We're loving our new bed, and I would absolutely recommend making your own platform bed frame and headboard if you're considering it. It wasn't difficult, and I'd say the results are worth the work for sure! The bed frame feels very sturdy. We assembled it in our room because it wouldn't fit through the door frame otherwise, so just a tip in case you have small doorways like we do! If you're curious about our mattress, it's a Natural Escape from My Green Mattress and it's SO comfortable.
Our room is really coming together now with our bed, mattress, and new bedding from Cariloha. It's MUCH improved with our new DIY platform bed frame and headboard. I wish I'd taken a before picture with our old box springs so you could see the difference! We've really gotten the DIY bug now, and are dreaming up all kinds of things we want to build next. Click here for step-by-step instructions on building a bed frame!
What do you think of our DIY platform bed frame and headboard?
I'd love if you'd share your thoughts with me in the comments!
Sandy Simons says
I absolutely think it's PHENOMENAL to buy and put together everything to make a bed without the high price of the store , looks comfy and fabulous!
Amber says
Thanks so much Sandy! Six months later and we are still loving our platform bed frame and headboard!
Kimberly Caldwell says
How long did you make the legs of the bed?
Amber says
Hi Kimberly,
SO sorry for the delay in response! We used a 4x4x8 piece of fir (heavy duty wood!) for the legs and cut it into 8 pieces at 6" each. Then we screwed them into the inner frame!
Lance Wooley says
Making this bed frame for our new home this weekend! looking forward to it. Look simple and comfortable.
Amber says
Hi Lance! How did the frame turn out?
Dan fitzpatrick says
Looks great. About to build this bed frame myself. The only issue I see here is it would be helpful if you put in all the measurements in the directions. Just a helpful tip for your next DIY post.
Amber says
Thank you for the tip, Dan! I will definitely update the post when I get a chance with the measurements in the directions!
Lauren says
Are the legs necessary for stabilizing, or could this sit directly on carpet?
Amber says
Hi Lauren! It could sit directly on carpet! The only thing I'd be concerned about is the mattress being able to "breathe" underneath so you'd want to make sure to flip the mattress sometimes.
Erin says
Hey Amber! I’m wondering if you have the measurements of the boards after they were cut? My mattress measurements are the same as yours are and I would love to have the lumber cut at Home Depot to save that work for myself since they will do it for free!!!!!! Erin
Amber says
Hi Erin! First off, I had NO idea Home Depot would cut the boards for free! That's awesome and something I'll have to take advantage of for our next project 🙂 Here are the measurements:
Thirteen Slats: 79"
One 2x4: 79" (Inner frame footboard)
Three 2x4: 75" (inner frame length and middle support boards)
Two 2x6 (for head and foot of bed): 81 7/8"
Two 2x6: 76.5"
Eight 4x4 feet: 6"
Let me know if you have any other questions!
John says
Hi! Do you have a standard king mattress or a Cali King? I am trying to build this frame before my new mattress arrives and says King is 76x80. Just curious if your mattress dimensions varied that much from the size it is supposed to be.
Also, for the inner side and middle support, if your mattress was 75” Long, making those boards 75” long would make the total inner frame longer then the mattress factoring in the 1.5” width of the footboard right? Or am I confusing myself here.
Thanks!
Amber says
Hi John,
Thanks for reading! We have a standard king, 76"x80" also. It honestly ended up being a little shorter than the full 75" but width-wise it was accurate.
You're right about the extra space at the foot of the bed-we wanted to make it a bit longer than the actual mattress so we could easily tuck sheets in without squishing our fingers, though the mattress isn't quite the full 75" so there ends up being about 1.5" of space at the end of the bed. You could definitely shorten the inner supports if you don't want to have that gap!
If you have any other questions please let me know!
Melissa Storms says
Ummm, Home Depot will cut for free?!?! Game changer, I was showing this to my husband but if HD will cut for free, this would be a great mom and son project. This is really a nice bed, I love the way the different stains look on the headboard.
Amber says
I had no idea about that either! Though I checked and ours will only do three cuts for free-they charge you for each cut after that. Stores may vary, though!
Mike says
You have 9” down for inner frame length. Is that a misprint?
Amber says
So sorry about that, Erin! It should be 79".
Jen Ha says
very interesting thanks for the diy!!
Michael Wilson says
So obviously this is absolutely beautiful, but do you happen to know what your total cost was for all of the materials? I'm wondering how the it compares to buying a regular bed, particularly one of similar quality (and beauty).
Amber says
Hi Michael! Thanks so much-we are very happy with it. The total cost came in just under $150 for materials. Of course, we had leftover stain and some scrap lumber as well. The platform bed itself cost around $100 and the headboard about $50. Let me know if you have any other questions!
Andre says
Your slats are 75”? I cut Them all to 75” but they are too short.... now I have to go buy 13 more 1x6 boards to redo it. Innner board to inner board width is about 78 1/2”. Bit frustrated.
Amber says
Hi Andre, that's correct - our slats and our width of inner frame of the bed are cut to 75". The width of the inner frame should be 75 inches with the 79" length boards screwed into them. The 75" slats will reach across the 75" inner frame length and screw into the 79" length boards on the ends and in the middle. If you put the 79" boards on the outside of the 75" boards, I can see how you'd run across an issue with the slats being too short. But if you're able to remove the screws and use the 75" 2x4s as the widest part of the bed, and then screw the 79" boards into them (you can sort of see what I mean if you look at the 5th photo in the post where my husband is putting the legs on) you will be able to use your 75" slats and won't need to buy new boards!
Lynne B says
Our foam mattress came with a frame, that promptly broke. I love, love, love that you DIY'd this!
Amber says
Oh no! Sorry that happened to you! Thanks so much for the positive feedback 🙂
Tamra Phelps says
I had too pin this. I think it looks amazing and it really seems doable! I like it.
Amber says
Thanks Tamra! It was very simple to make!
Christina Gould says
Wow, that frame is beautiful. I love the headboard. Thanks for posting!
Amber says
Thanks so much Christina!
Holly Thomas says
I like how sturdy this is, I would trust it more than store bought!
Amber says
THanks Holly! It is SUPER sturdy! Which also means it's very heavy, but it's worth it 🙂
Sapana V says
This project looks great!! However, I wish the measurements were given… By the way, really interesting and easy!
Amber says
Hi Sapana 🙂 All of the measurements are in the post! Let me know if you have any questions!
Brittany says
I can't wait to make this! Our current bed is so tall I hate having to climb and roll into it! Can't tell by the pics but how high is the top of the mattress from the ground. I'm 5'3 and hubby is 6'3 so I need a happy medium. I just want to be able to sit and put my pants on with my feet touching the floor (sorry 7 months pregnant and struggling here). Can i cut my legs a little longer if I want it to sit a bit higher?
Amber says
Hi Brittany,
So sorry for the delay in response! I'd say the top of our mattress is about 2 feet off the ground. I'm 5'6" and it hits right where my knee bends if I sit on the edge. You could cut the legs so it would sit a bit higher if you'd like, too! Though this is a good height if you want to reach your feet 🙂
David Pittard says
Thanks for the bed ? instructions
I was wanting the information to build the head board
Thanks again
David
Amber says
Thanks for reading David! Here's a link to the headboard with instructions: https://www.vivaveltoro.com/make-wooden-headboard/
Karlos says
We bought a new bed today and went off of this and it turned out perfect. We are playing to build the head board later this week thank you so much!!!!
Amber says
That is awesome, Karlos! Thanks so much for sharing, and reading!
Justin says
Thanks for posting this, while it is nice to have some instructions to go by the way you have the measurements and where your saying they go do not line up. The way you have it your mattress is turned sideways which is fine for you but anyone reading this and trying to go by this would have a very messed up bed frame to fit and for an actual king size bed which is 76 inches wide and 80 inches long not vice versa.
Amber says
Thanks for the input, Justin! I've updated the post to reflect that our mattress is technically sideways so readers will need to adjust the dimensions if they prefer their mattress to be longer rather than wider.
James Kurtzke says
Is your slat length of 79” correct? Should the slat length be the width of your mattress, which is 75”?
Amber says
Our mattress is 75"x79" and we actually turned it the wide way for cosleeping, so we have the width at 79" and the head to foot at 75" 🙂 There is a bit of extra space from head to foot to allow for easier sheet-tucking, but you could make it the opposite way if you want your mattress to be longer versus wider! Please let me know if you have any other questions! 🙂
Riva Lane says
Hi!
Can I ask where you live? We just bought the supplies for this (lumber, glue, screws, clamps, stain, top coat, foam brushes...already owned all of the tools) for the bed frame and headboard, but slightly bigger. We're making a king + twin xl together, so 114" x 80" bed. We spent $425 today NOT including the outer 2x6x8 (x2) and 2x6x10 (x2). That was for whiteboard slats, pine headboard, doug fir inner frame/support beams/4x4's...so we used the CHEAPEST wood we could find!!! It'll probably end up costing $500 total and ours is only 3feet longer than yours! How the heck is is $350 more?! Just trying to figure out where we went wrong lol! We bought at lowes and compared prices to home depot and a few other hardware places locally.
Thank you! So looking forward to this giant family bed!!
Amber says
Hi Riva,
Holy cats! That's a LOT more than we spent! We bought all of our lumber at Menards and Home Depot, and then got the stain and brushes, etc. from Wal Mart. I wonder if the difference is in the length of the boards? Did you purchase 10 or 12 foot pieces? We bought 8 foot pieces. Other than that I can think of why it would be so much more! We do live in rural central Minnesota, but I would think things would run similarly at most lumber stores!
Andrew says
This looks great! I'm about to build one and am going to use you're design for inspiration. How is it holding up, and what would you change?
Amber says
Thanks for reading Andrew! It's holding up great, to much abuse from two adults and two young kids who are constantly using it as a jungle gym 😉 If I were to change anything, we'd shorten the top to bottom length because we have about 3 extra inches of space now that the mattress has shifted. Otherwise we are super happy with it!
Barry says
For anyone considering this project, Ikea sells ready-made slats for most bed sizes under the name LURÖY. These are curved upwards to provide some extra springiness and are held together with fabric
Thank you, Amber, for a great project.
Amber says
That is GREAT to know, thank you Barry! And thanks so much for reading!
mar canet sola says
Thanks for instructions of this nice wood bed frame. We need one that is not tall and this design is perfect. I am going to do it soon. I will send you pictures how it look.
JOhn says
How sturdy is the headboard? Would you change anything in reinforcements? Just curious about whether the 1” boards flex when you roll over in bed?
Amber says
We find that it's very sturdy, thanks for asking! Our kids actually climb up and sit on the top edge and jump off, and we haven't had an issue. We did connect it to the bed frame with heavy duty screws so that helps! Please let me know if you have any other questions!
cadenaspe341 says
My husband used these plans from WoodPrix's plans and he's very satisfied. However. I love Yours !
Brian P says
How heavy did the frame turn out to be?
If you ever moved, or wanted to move this to another room, I assume that it would have to be dismantled.
Love the printable instructions and the headboard as well.
Amber says
Hi Brian,
I'm not sure how heavy it is exactly, though we did move rooms and it was quite sturdy/heavy feeling. When we moved it, we did remove the headboard but were able to fit the frame through the door and carry it with two adults, so it was manageable!
Thanks so much for reading!
Amber Lynn says
Thank you so much for this thread. I made this bed in about 2 weeks. I tweaked it a bit. I cut my 4x4 posts to 18 inches so we could store things under the bed and i used 17 slats due to a memory foam mattress. My total costs for the frame only were about 280 and i have not started the headboard yet. If your doing a dark stain or want a rustic look, go for treated wood which stains and is cheaper. i only purchased the 2x6s in treated and they came out looking more our taste than the pine (stained gunstock).
Amber says
Thanks so much for reading and for the suggestions on tweaking the bed also, Amber!
Hannah says
Do you think it would be sturdy enough if I use 1x6x8 boards all the way around it instead of the 2x6x8 boards?
Amber says
Hi Hannah,
I would think it would be fine as long as you still line it with the 2x4 boards as well and use the slats. Though I do think the 2x6 boards give it a more finished looking feel as the 1x6 would be fairly thin. Hope this helps!
Nick says
Thank you for the inspiration.
I ended up cutting the middle 2x4 short at the headboard, and used a 2x4 cross beam attached on the backs of the feet. This made it as sturdy as having just the 2x6 on the outside, and then I actually left off the exterior piece, and it now sits flush with the wall.
Amber says
Thanks for reading, Nick! Love the adjustments you made!
Katrina says
So excited to tackle this project - it's exactly what I've been wanting in a bed frame. 🙂
One question: where did you use the glue?
Thanks!
Amber says
Hi Katrina! We used the glue in the screw holes just to give it a little extra "sturdiness"! I hope you enjoy the project! We're laying on our bed frame as I type this and still love it!
Katrina says
Thanks so much for the reply! I just finished sketching out our version - so excited!
Amber says
Awesome! I'd love to see it when you complete it!
Brittany says
Is this a floating bed or just a regular bed frame
Amber says
It's a low profile bed frame, but it does have legs! Hope that helps.
Cori says
Do you think it would work to have longer legs?
Amber says
Hi Cori, I think you could definitely do longer legs. If you do, I would add a couple more supports closer to the middle though as well as the frame is quite heavy.
Jennifer says
Hi, do you happen to know how to do this, but for a full mattress?
Amber says
Hi Jennifer, while I have only built it for a king mattress, I believe you could just use your mattress measurements and adjust the slats and outer boards accordingly!
Braxton says
Great job! Im going to attempt this soon, I want to add storage somehow too.
Bre Kennedy says
Love this frame! I was wondering if it would include major modifications to make the legs taller?
Amber says
Hi Bre,
I'm no master at construction but I would think as long as your feet are 4x4 you could make them taller! You could also put more feet under the support boards to make sure the weight is distributed evenly. Hope this helps, and thanks for reading!
Elise says
I just finished this bed yesterday and man, it was tough for a woodworking newbie! Definitely proceed with caution if you don't already know that 2x4s are NOT 2"x4" haha
Question: is there anything to be done to stop the bed frame from creaking? Has anyone else had this problem? It's so loud it wakes me up when my husband gets in or out of bed.
Amber says
Ahhh good call Elise; maybe I should mention in my post that 2x4s are not actually 2" by 4"! As for the creaking, we haven't noticed that with ours but maybe over time and as the bed settles more it will lessen? Hopefully, anyway!
Kayli says
Gluing in addition to screwing the boards together can decrease creaking in wood. Lookjng forward to trying this build.
Thanks
Ryan Manuel says
The creaking might be related to the friction between the slats and the 2 x 4 supports. You can try putting felt pads or stickers (as long as not too thick) in the underside of the slats. It's a process if that's where your creaking is coming from. I had to do that to a diy bed and it solved the problem. Good luck!
RJB says
How are the different colored planks attached to the headboard?
Amber says
Here's the full tutorial for the headboard! https://www.vivaveltoro.com/make-wooden-headboard/
Dan M says
why did you decide to do a 2x4 footboard but not a headboard?
Amber says
We wanted to put the headboard on and not have a large gap for our pillows to fall into!
Leigh S says
Hi and thank you. This is just what I needed for a guide. Question: I already have a wood headboard, how did you attach the frame and headboard together? Did you get parts?
PS I love that you cosleep too!
Amber says
Hi Leigh,
Thanks for the comment and encouragement on co-sleeping! We actually screwed the headboard directly into the bedframe. It's probably not the prettiest option but it works!
Sherri York says
Hi
Roughly what is the coast of building this bed frame? BTW I am in love with it! You guys did an amazing job!
Amber says
Hi Sherri, I can't remember exactly how much this cost us, but I know it was under $250! Hope that helps! And thank you, we love it!
Corinna says
Hi Amber,
could you tell me what measurements did the feet have? Is 6 inches the height of them?
What are their width and length?
And what was the depth of the outer and inner boards? Because I read in some comments that your measurements of 2x4 and such aren't referring to the real inches.
Hope to get a reply soon as I'm going to try to do this bed next week, however with feet that are 50cm tall.
Best wishes from Tenerife
Amber says
Hi Corinna! My feet are just 6 inches in height as we wanted the bed super close to the ground. You could do longer feet, they are 4x4 inches around, so as long as you use sturdy wood you should be fine making it taller. We purchased our 2x4 boards at a lumber store; from what I understand, a 2x4 is actually about 1.5x3.5 inches. Let me know if you have any other questions!
Jon says
Just built this, great directions. Thank you. Only change I made was longer legs, my dogs sleep under the bed. ?
Amber says
Thanks so much Jon! Love that your dogs can sleep under it with the heightened legs!
Lori Kelly Lohnes says
How high did you make your legs? I’m thinking on creating this for my bedroom. But do want it a bit higher. As well did you add a head board I was thinking on doing that but inserting it. Thank me
Amber says
Hi Jon, so sorry for the delay on this! Our legs are just 6" tall; you could definitely make them longer if you want! We did add a headboard, too! At the end of the post there is a link to it!
Ben says
Hey, you have done an awesome job. I really like this bed and am going to make it myself.
One quick question, how reversible is this type of construction (i.e. for moving house)?
In the original plans you linked the builder used pocket holes which are kind-of permanent... I noticed you didn't seem to use that method though.
Ben
Amber says
Thanks for reading Ben!! We didn't do pocket holes partly because we didn't have the Kreg jig to make it easier, but also because we wanted to be able to take it apart and move the bed eventually. Funnily enough, we did move the bed to a different room after just a month or so, and it came apart easily to get through the doorways!
fazanhamrock says
I will make it myself this week I think. Just got instructions from WoodPrix and I'm ready for do it 😀
Kelsi says
Love this! Thanks for sharing. If we wanted to avoid the height, could we totally do away with the legs & leave the frame on the ground? We too cosleep and would like the keep it even lower than yours appears to be. How high up is the top of the mattress from the floor on yours? Thanks!
Amber says
Hi Kelsi, thanks so much for reading! Our mattress is just 18" off the floor! I think you could do it without the legs, but the downfall would be that it would make it super difficult to move. With the legs, we can fit our hands underneath to lift and turn the frame if necessary. That being said, you could probably lift it via the slats if necessary, but it is super heavy 🙂 I hope this helps!
Angela says
Yeah i would want it taller also, was just about ask the same.
Adam Wood says
I just finished this. It was mostly pretty easy. I made the legs 18.5" as we like it higher and it helps with my bad hip. I could have sanded better I learned. I also got some run off of the poly that doesn't look so hot in places but oh well. My only complaint is the corners of the 2x6's. With the legs you don't get to screw screw the corners in tighter via the 2x4's into the 2x6's. I may end up running a couple screws in the bottom footboard 2x6 just to tighten that up. It seems really solid and I don't notice any creeks. About to sleep on it for the first night so we'll see. Next project is a headboard. Yours just isn't my style so I'll be trying something else. Thanks for the post as it was really one of the easiest to follow on any bedframe post I was finding
Amber says
Thanks so much for the kind comment Adam! I'm glad it worked out well for you and I like the adjustments you made also!
ARNETTE & RICHARD says
O.M.GOSH MY HUSBAND AND I MADE YOUR BED FRAME , LAST NIGHT WAS OUR FIRST NIGHT SLEEPING ON IT, AMAZING. THANKS SO MUCH FOR THE D.I.Y. INSTRUCTIONS. WE GLUED AND SCREWED EVERY PIECE OF WOOD AND NOT ONE CREEK. WE REALLY LIKE IT AND IT LOOKS AWESOME IN OUR BEDROOM. i SANDED THEN PAINTED ALL THE BOARDS WITH A GOOD COAT OF BLACK PAINT... LET IT DRY AND THEN PAINTED ALL THE BOARDS WHITE AND THEN SANDED ACCORDINGLY TO EXPOSE SOME BLACK. WE LEFT OUR 12" BED LEGS BLACK AMD DIDN'T PAINT THE SLATS. MY ONLY RECOMMENDATION IS TO BE CAREFUL WHERE YOU BUY YOUR LUMBER. WE BOUGHT OURS AT HOME DEPOT AND SOME OF THEM TWISTED. NEXT IS SOME SIMPLE NIGHT STANDS. THANKS AGAIN, IT IS SO CUTE THAT YOU HAVE YOUR CHILDREN INVOLVED IN THE CREATING OF A PIECE OF FURNITURE, MEMORIES FOR LIFE.
Amber says
Thank you SO much for the kind comment! I'm so glad you're loving your bed frame; we are laying in ours right now and it's held up wonderfully 🙂 Have a great week!
ARNETTE & RICHARDDAHLEN says
O.M.GOSH MY HUSBAND AND I MADE YOUR BED FRAME , LAST NIGHT WAS OUR FIRST NIGHT SLEEPING ON IT, AMAZING. THANKS SO MUCH FOR THE D.I.Y. INSTRUCTIONS. WE GLUED AND SCREWED EVERY PIECE OF WOOD AND NOT ONE CREEK. WE REALLY LIKE IT AND IT LOOKS AWESOME IN OUR BEDROOM. i SANDED THEN PAINTED ALL THE BOARDS WITH A GOOD COAT OF BLACK PAINT... LET IT DRY AND THEN PAINTED ALL THE BOARDS WHITE AND THEN SANDED ACCORDINGLY TO EXPOSE SOME BLACK. WE LEFT OUR 12" BED LEGS BLACK AMD DIDN'T PAINT THE SLATS. MY ONLY RECOMMENDATION IS TO BE CAREFUL WHERE YOU BUY YOUR LUMBER. WE BOUGHT OURS AT HOME DEPOT AND SOME OF THEM TWISTED. NEXT IS SOME SIMPLE NIGHT STANDS. THANKS AGAIN, IT IS SO CUTE THAT YOU HAVE YOUR CHILDREN INVOLVED IN THE CREATING OF A PIECE OF FURNITURE, MEMORIES FOR LIFE.
Jen says
I just a question about how much space you left on each side. We are going to do this for a queen bed, so I was just curious how much bigger than the mattress to make it so the wood is a tab exposed.
Susie says
Hey there! Sweet bed, I am about to make it myself, but would like to clarify whether or not you put the 2x6 at the head of the bed. Your explanation as to why you were thinking of not adding it on makes sense but it looks like you did add it on in the pic. Either way, thanks for the tutorial! Mama needs to get her mattress off the floor!! 🙂
Amber says
Hi Susie, so sorry for the delay in response! We actually did do the 2x6, but we skipped the (unstained) 2x4. I hope that helps!
Michael S Titchenal says
My wife and I looked at your plan and with a few modifications we are going to use it for a Sleep Number mattress. Additionally, for additional storage and support under the bed make the legs 18 inches in 6x6 and notch them so the frame rests on the legs instead of being attached to the side.
Marci Wilson says
This is exactly what we're planning on doing!! Noone ever complained about extra storage.
Darcy Malquist says
Hi, how did you notch the 6x 6 legs? Thanks!
Jerri Morse says
So is that the instructions for a king bed?
Amber says
Yes, though king beds can vary in size so I would measure your mattress first if you plan to make it!
michelle cohenour says
I was going to do this with our cal king but i have no idea what to modify it to and no one seems to have plans for a cal king bedframe.
the dimensions of our bed is 72 x 84
Amber says
Basically what I did was took the dimensions of our mattress and added a couple inches on each side to get the dimensions for the inner frame, and then worked outward! Sorry I don't have precise instructions for a California king!
Tonya Spence says
Does this include the instructions for the headboard? I would love to make it as well:
Amber says
Here's the tutorial for the headboard: https://www.vivaveltoro.com/make-wooden-headboard/
Thanks for reading!
Prashant Malhotra says
Hi,
Lovely bed I must say. It’s very inspiring. I had stored your pin (Pinterest)for many months, and now would be making one for ourselves.
Question: how did you attach the outer frame to the 2 *4. Were they glued, as I am not able to see any screw holes in the pictures.
Amber says
Thanks for the question Prashant! I believe we screwed from the inner boards into the outer boards, so you won't see any screw marks on the outside.
Joshua says
I want to clarify something for myself and anyone else building this. Our mattress, like yours, is 79x75. You stated that your inner 2x4 Frame is 79x75 to match the mattress, however you have cuts listed for 3 75" boards for the sides and center support of the frame. However, if you cut your sides and center 2x4 to 75 inches, and then frame those up with the 79" 2x4 at the foot of the bed, you've added an extra 1.5 inches to the length of your frame (75 inches long plus the 1. 5 inches of the 2x4 they screw into.)
This is going to cause the matress to line up 1.5 inches shorter than the length of the inner 2x4 frame at either the foot or head of the bed. Just wanted to point that out. Didn't know if it was a typo or something that wasn't figured into the original plans for the build.
Amber says
Thank you for the clarification Joshua! We did end up with a little extra space on each end that makes it a little easier to change the sheets and tuck blankets in!
Michele says
How do you plan on moving it? Is there a way to take it apart?
Amber says
Hi Michelle! We actually did move it to a different room but we kept it assembled; it fit through the doorway though it was super heavy! We just removed the headboard to get through the door.
Deborah D says
This seems really easy to do not to mention cheaper.
Tara says
Beautiful job!😍 I was waiting on the directions for your headboard I love that also? Is the wood glued and screwed to plywood behind it?
Amber says
Hi Tara, thanks so much! Here's a link to the headboard and how we attached it: https://www.vivaveltoro.com/make-wooden-headboard/
Brittany says
Great job! I believe I'm going to try this. Just was curious about one thing. At the top it says 15 1x4s for slats, but final measurements shows 13 slats. Am I missing where the extra two 1x4s go?
Thank you!
Amber says
Thanks for catching that! I am updating the post to reflect the 13 we actually used. I think we purchased 15 but didn't end up using all of them. So 13 is the correct number!
Elizabeth says
I'm so glad I saw this comment and answer! I saw on the top it says 3 1x4x8s, and I was trying to figure out how 3 were supposed to be cut to make 13. I'm assuming now that's a typo and should be 13 instead of 3. I'm planning on making this bed when we move into our new house in a couple weeks. Thanks so much for these plans and instructions!
Chelsea says
Thank you for this!! Got it all put together today, and it was so easy! I did adjust the measurements because we have our mattress turned the other orientation and took away that extra inch or so at the bottom so it would fit the mattress more snugly. Love it, thanks again!
Jen says
Trying to make this bed over the weekend!! Wish me luck!