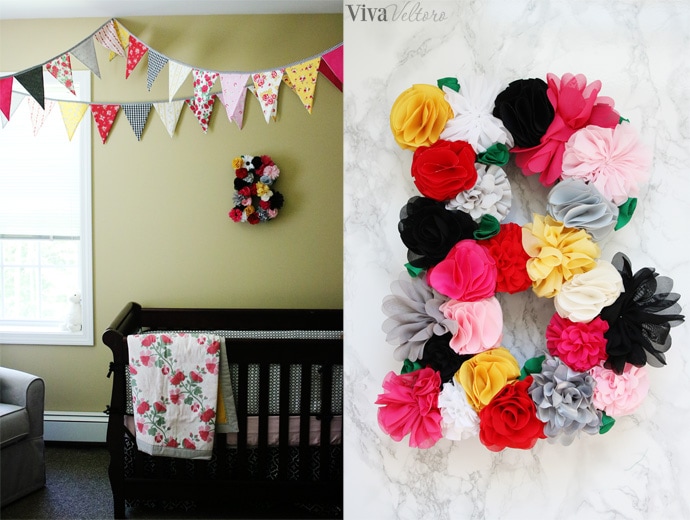
DIY Flower Letter Tutorial
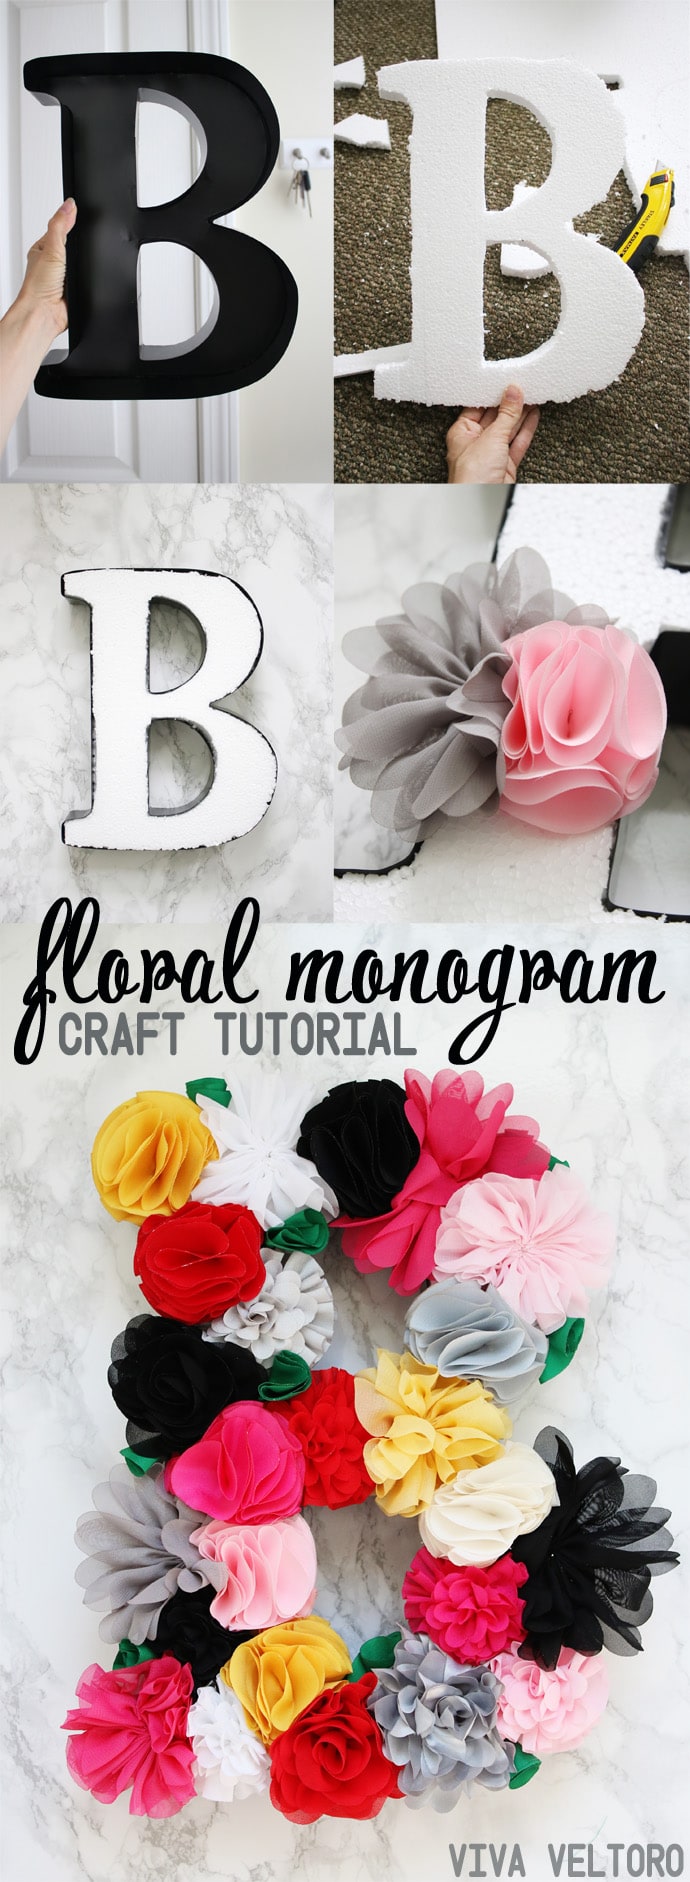
I often think about why I love DIY projects so much. Is it because I like saving money? Is it because I can personalize these projects, so that they are unique and meaningful? Yes and yes, but I think the biggest reason is because I just love to CREATE! I love the satisfaction that comes from using my hands to make something from mere parts and supplies, and then the sense of pride I feel every time I look at that project, knowing that I had a hand in it. I'm kind of still wrapped up in getting Little B's nursery just exactly the way I want it, and I knew that I wanted a big letter "B" up on her wall. I've seen lots of variations of painted paper mache letters, but I knew that with the help of Sunshine Shoppe Supply, I'd be able to create something way cuter, like this flower letter monogram for my little lady's bedroom.
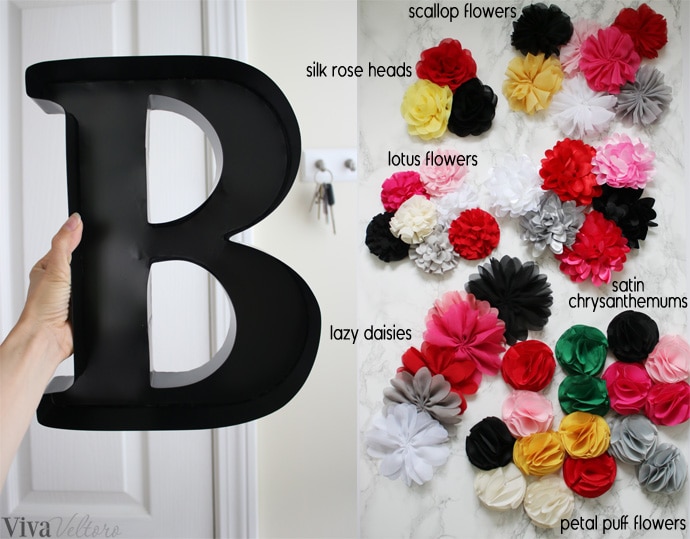
This giant metal letter is a wine cork holder, meant to be hung on the kitchen wall filled with wine corks. It is about two inches deep, and I was able to find this on Amazon for around $20. Just search for "Metal Wine Wall Cork Holder". The size is perfect as a statement piece, and very sturdy, plus it has handy display hooks on the back for when you want to nail it up. At no cost to facilitate this project, I picked out some beautiful fabric flowers from Sunshine Shoppe Supply! Their inventory of flowers is practically endless! They have all sorts of gorgeous varieties in a rainbow of colors, plus all the elastic, lace, appliques, beading, trim, tulle, rhinestones, and embellishments to take your DIY projects to the moon!
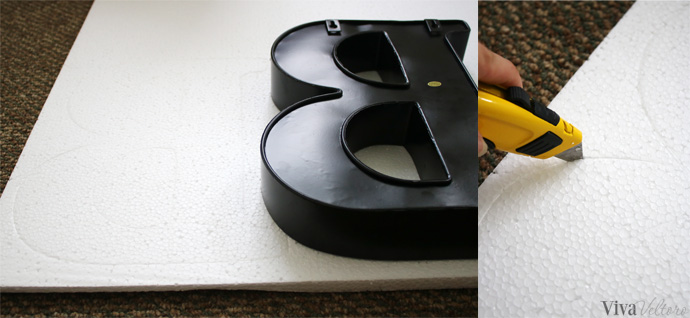
The first step is to fill your letter with some sort of filling. You could use floral styrofoam, but I opted for stacking standard packing styrofoam that we had lying around from our recent move. I simply pressed the metal into the foam and traced along the imprint with an small blade. It cut precisely enough and quite easily. With thicker foam, perhaps a serrated knife or even an electric knife would do the job well.
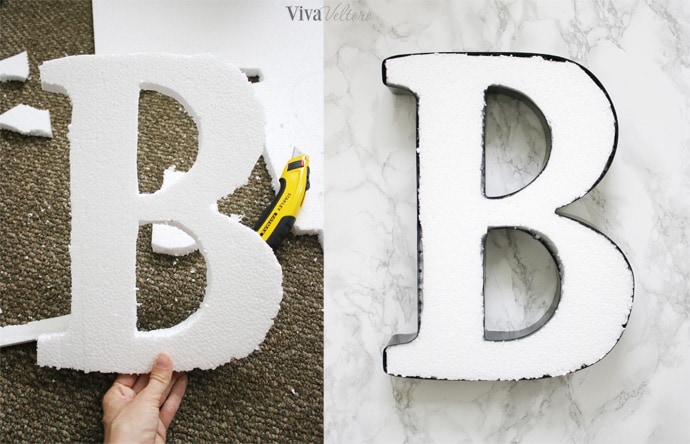
I cut out three of these to fill the deep letter. With thicker styrofoam and a shallow letter to fill, you might only need to cut out one. The foam filled the spaces snug, and I didn't feel the need to glue or tack it down. It wasn't going anywhere.
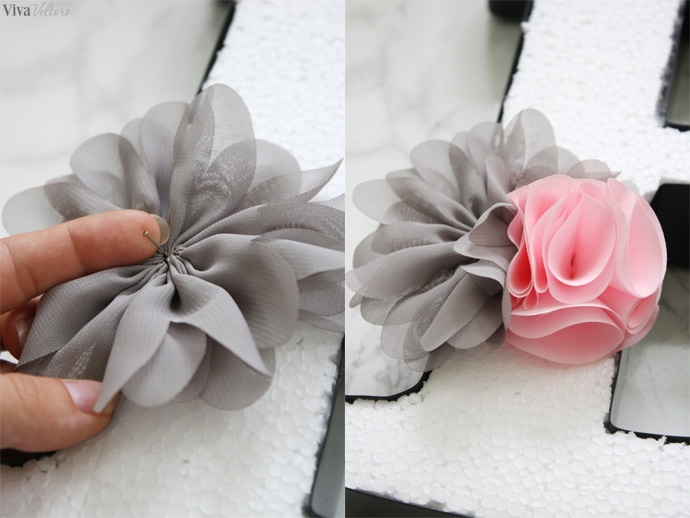
Now add all those pretty fabric flowers! I liked the idea of using pins because it meant I could move things around or make changes as I went along, which you wouldn't be able to do if you were hot gluing these down. All you need are straight pins (the ones without a big plastic round head). I recommend placing them quite close together to get a nice, full look.
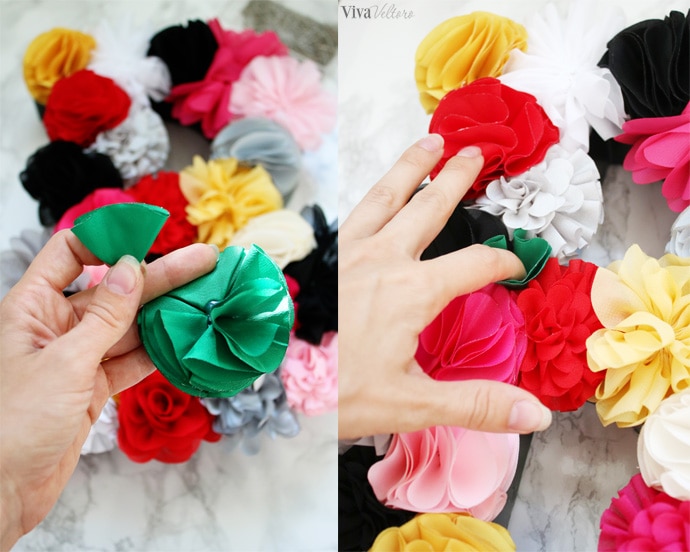
For the foliage, I took one of the green petal puff flowers and and took off a few of the petals. I folded them a time or two, then poked and pinned them in place.
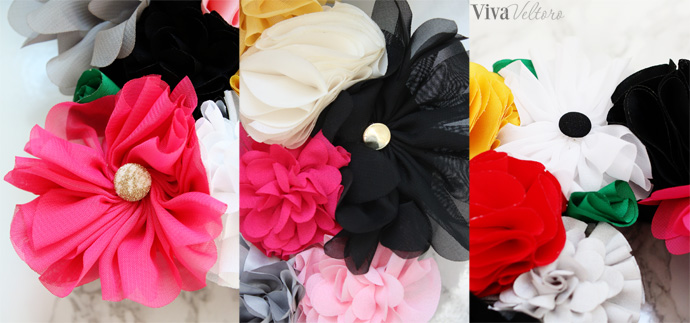
Then have fun embellishing! Add buttons, rhinestones, or other small items to a few of the flower centers. I hot glued these down and fixed it on the wall using the nail fixtures on the back. I love how it turned out! I think its a charming focal point and sweet as can be!
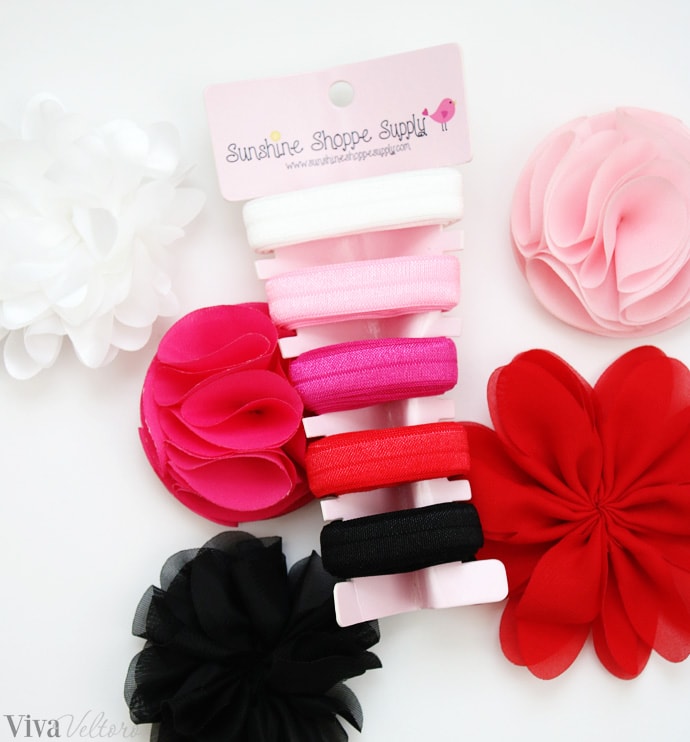
Now what do you do with the leftover flowers? Make baby headbands, of course! Sunshine Shoppe Supply has quite the impressive array of elastic too, and I was able to find a Bundle Collection of fold over elastic in just exactly the colors I needed! This is an excellent way to get a group of coordinating colors of fun collections at a great price under $5.
One of my favorite things that Sunshine Shoppe Supplies carries are these DIY Headband Kits!! I reviewed the Sunshine kit earlier this summer and gifted it to my sister when we used it as an activity at her baby shower (and it was a fantastic success), and here is the DIY Headband Station Kit - Version 8.0. I took a good look at Little B's wardrobe, and decided that this kit so perfectly compliments the clothes that she has and wears.
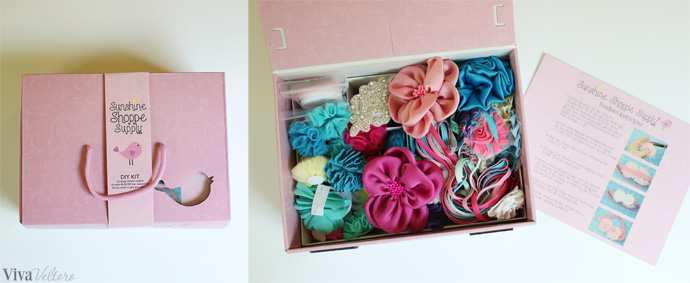
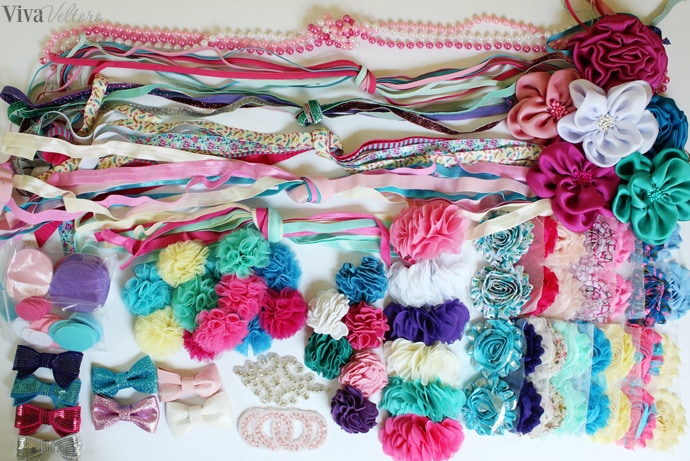
So many gorgeous flowers and glitter bows in this one! I love the variety of styles and how easy it is to make accessories with complimentary elastic. These DIY kits contain everything you need to make 40-50 headbands or accessories! Some of the kits contain headbands and alligator clips. You receive all the felt circles you might need for the backing, so really, along with included instructions and a measuring guide, all you need is a pair of scissors and a hot glue gun!
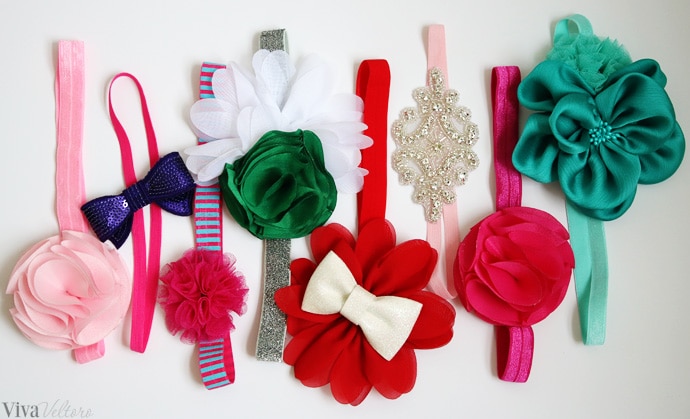
I am having a ball putting these together! Its such a treat to go through the box of wonders and pick out something darling and coordinating for almost every outfit B is wearing!

Oh what fun this was! And since this kit makes 40-50 (and probably more) different headbands, I still have hours and hours of headband-making joy ahead! If you'd love create some absolutely gorgeous hair accessories for your little girls and just need a little direction as to where to start, or merely want to save yourself the hassle of hunting for all pieces separately, I so highly recommend these DIY kits!
Buy it: You can purchase the DIY Headband Station Kit - Version 8.0 for $79.99, and all of these fabric flowers can be bought separately on the Sunshine Shoppe Supply website.
Disclosure: I (Camille) received the DIY Headband Station Kit and an assortment of floral supplies at no cost to facilitate this review. All opinions are my own.
Amy Tolos says
I'd love to have the Vintage Collection...what an awesome idea!!!
Connie Kemner says
I'd opt for DIY HAIR ACCESSORY KIT - PRIMARY RAINBOW.
Sandra Caballero says
Love DIY crafts
adriana says
I woyld choose the DIY Hair Accessory Kit - Pastel Rainbow.
KaySue says
I would choose the DIY Hair Accessory Kit - Pretty in Purple.
julie lee says
I love the ballerina and coral reef kit!
Peggy hogan says
I love the pastel and the autumn collection kits.
Mindy says
Elegant or vintage they are all so cute!
Asha gregory says
I like the pastel kit. How fun!
Amber Ludwig says
Omgosh they are all so gorgeous!! I would choose Vintage or Elegant!!
Natasha M. says
I would love to either DIY Hair Accessory Kit - Winter Wonderland or DIY Hair Accessory Kit - Pretty In Purple.
Jane Gordon says
What a great tutorial! I think it would be really cool to try a full name with different colored flowers on each letter. Just beautiful! Love the headbands as well!
Cindy Kong says
My favorite is DIY Hair Accessory Kit - Princess for my daughter.
Nikki Strong says
There are too many to choose from! I love them all. Some of my favorites include the ballerina kit, Version 4.0, Version 7.0, sweetheart, coral reef and beach blast.
cassie says
so many cute ones to choose from !! I think I'd get pastel rainbow or coral reef
Casey B says
I love the primary rainbow because there is a bit of everything!
Dandi D says
I don't know how I'd ever choose, but my favorites are probably the Peacock kit and the Spring Has Sprung kit.
susiehurfy says
I would choose the Ballerina - so cute and all my favorite colors!!
Karine Traverse says
That was tough, but I think Vintage would be my pick
Olivia Caswell says
DIY Headband Station Kit version 3.0 - Half Pint
michelle elizondo says
spring has sprung
Lisa G says
The coral reef has to be my favorite.
Lynn B says
It's so hard to decide! I think I would choose version 3.0 or beach blast.
Anna K. says
I like the floral print!
Rachel C says
Too cute! Love all the collections, especially "elegant."
Maryann says
How can I choose just 1?? Love the Ballerina, Sunshine and Vintage
Sarh S says
We'd love any of their DIY Kits!
Amanda Stovall says
Ooh neat! I wish I'd known about these when my daughter was a baby!!! Cute hair accessories were so hard to find! But, this would still be an awesome thing to have! I'd choose the DIY Hair Accessories Kit - Princess style!!! Thanks for the chance to win!!! 🙂
Monica Kirkham says
The holidays will be here before we know it. With that said, I would probably choose the Jingle Bells kit!
Noreen says
Spring unstrung or pastel rainbow
Hannah Avery says
Tough choice, but I might choose the vintage one!
Sarah Ballou says
I love the coral reef kit!
Amanda Alvarado says
I can't decide between the Peacock set and the Beach Blast set!
Jeanine says
I'd pick the DIY GLAM HEADBAND KIT - HALF PINT
Shannon Lucas says
The Vintage collection is super cute!
Jennifer M says
I love the Pastel Rainbow kit.
Dorothy Boucher says
I am loving the DIY Hair Accessory Kit - Vintage
Doorsie Morrison says
DIY Hair Accessory Kit - Sweetheart kit would be awesome to make!! All pretty colors & lots of materials to work with to create unique variations! Neat!
Jodi J says
Wow! I don't know how I'd ever choose one from all these choices. It would definitely be something with lots of pink and purple in it for my little princess. I really like the colors in the "glam" half-pint kit.
AJ says
I like the pastel rainbow kit! How cute!! What a fabulous idea. I can see why you enjoyed making these!! How fun!
Cathy Jarolin says
If I were the Lucky winner I would choose the Coral Reef Kit! Very hard to choose . I think I was there for 1/2 hr. All so pretty!
Lisa H says
I would choose the "Spring has Sprung" collection...so cute and love the variety of colors and styles!
Christina B. says
I like Headband Kit Version 4. and 5
Diana So says
The princess kit would be my top choice! My niece loves the color pink.
Eileen Richter says
I think my 2 lil grandies, age 3 and 4 AND the newest princess due in 30 days, would love to have the vintage kit. Love the subdued colors!
Amanda says
I would get the USA kit.
Hayley S says
I would probably choose the coral reef kit!
Mia says
I would pick the pastel rainbow.
Gayle S says
If I won, I would choose DIY Hair Accessory Kit, Peacock. Love the colors!
Carrie says
I love the elegant headband kit, although they are all amazing. What a great idea!
Lily Kwan says
I would choose the DIY Hair Accessory Kit - Floral.
Candie L says
I like the Elegant kit. Thank you
Alison Beutler says
I entered the diy headband giveaway
Laurie Nykaza says
DIY HAIR ACCESSORY KIT - SPRING HAS SPRUNG is so pretty.
Linda Manns says
These letters and flowers are awesome. What a fun project. The baby is beautiful in the pics. Thank you for sharing