• Skip to primary navigation
  • Skip to main content
  • Skip to primary sidebar
  • Home
  • About Me
    • WORK WITH US
  • Shop
  • Nav Widget Area

    • Facebook
    • Instagram
    • Pinterest
    • Twitter
    • YouTube

Viva Veltoro logo

  • LIFESTYLE
    • Beauty and Fashion
    • Reviews
  • Tieks
  • Recipes
    • Soup
    • Appetizer
    • Breakfast
    • Brunch
    • Dessert
    • Dinner
    • Drink
    • Snack
  • Travel
  • Wellness
menu icon
go to homepage
search icon
Homepage link
  • Home
  • About Me
  • Shop
  • Beauty and Fashion
  • Reviews
  • Tieks
  • Recipes
  • Travel
  • Wellness
  • Connect With Me

    • Facebook
    • Instagram
    • LinkedIn
    • Pinterest
    • Twitter
    • YouTube
  • ×
    Home » DIY Christmas Countdown and Card Display!

    November 3, 2014 By Camille 7 Comments

    DIY Christmas Countdown and Card Display!

    This post may contain affiliate links. Click here for more information.

    countdown

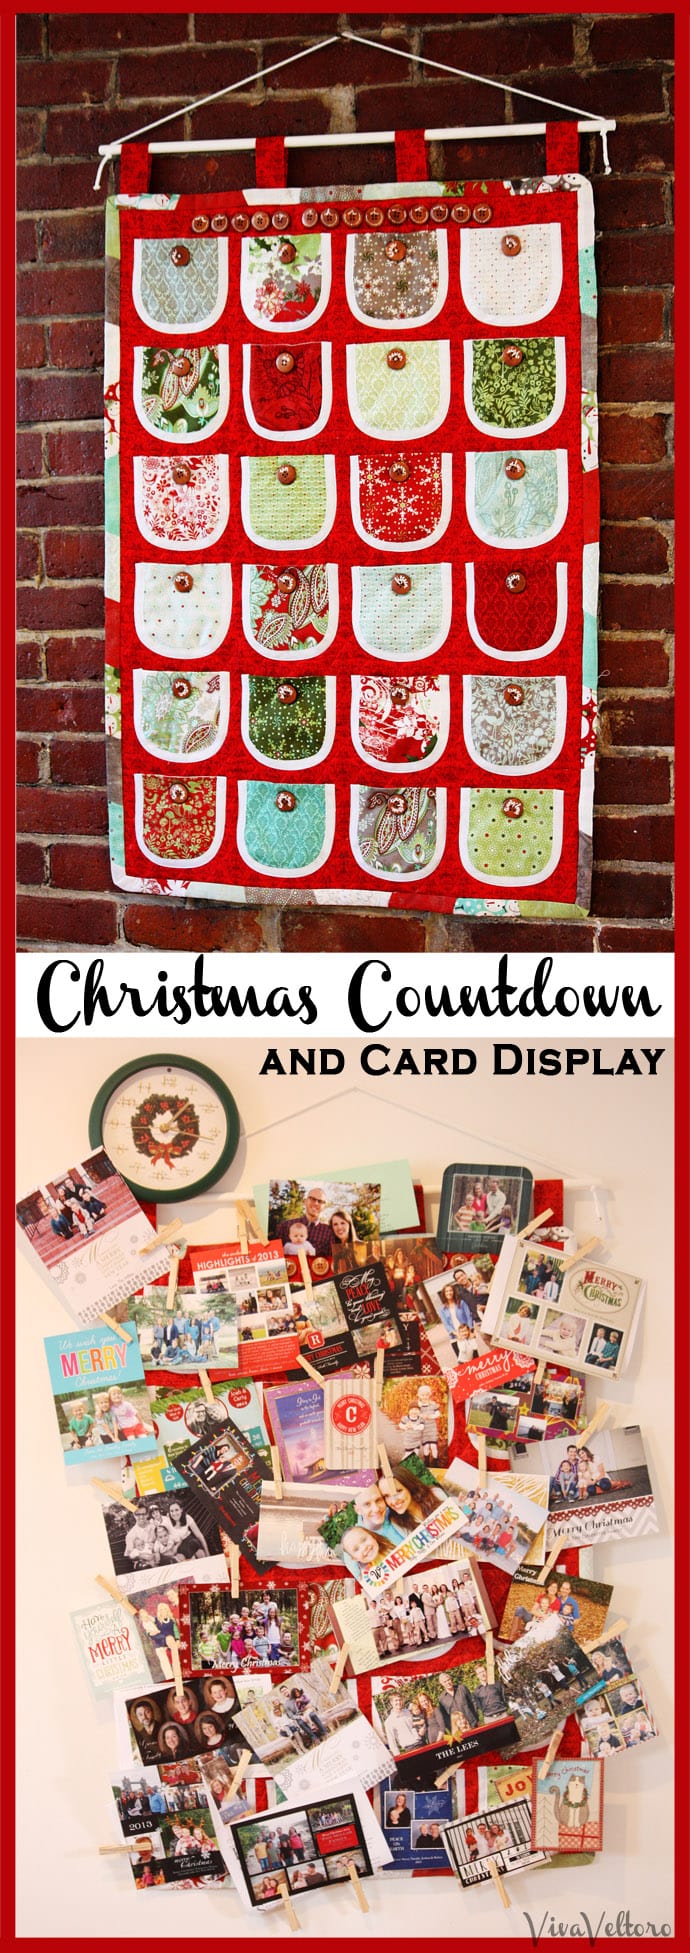
    So basically, its Christmas time! Its the season of the year where we crafters really hunker down and whip up projects and finish homemade gifts for loved ones, and here's a fun and easy one for you! I grew up in a home with seven or eight countdowns and we loved having so many things to change and update as the big day got closer! I've been trying to create a new countdown for my own family every year, and this Christmas Countdown can be filled with candy for each day until Christmas, and then used as a place to display all the Christmas cards you collect!

    christmas countdown

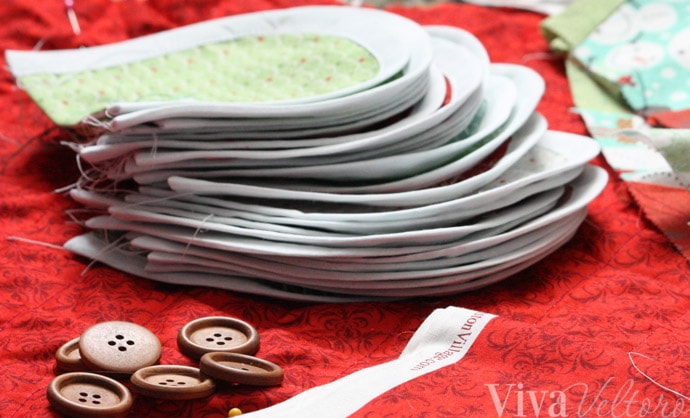
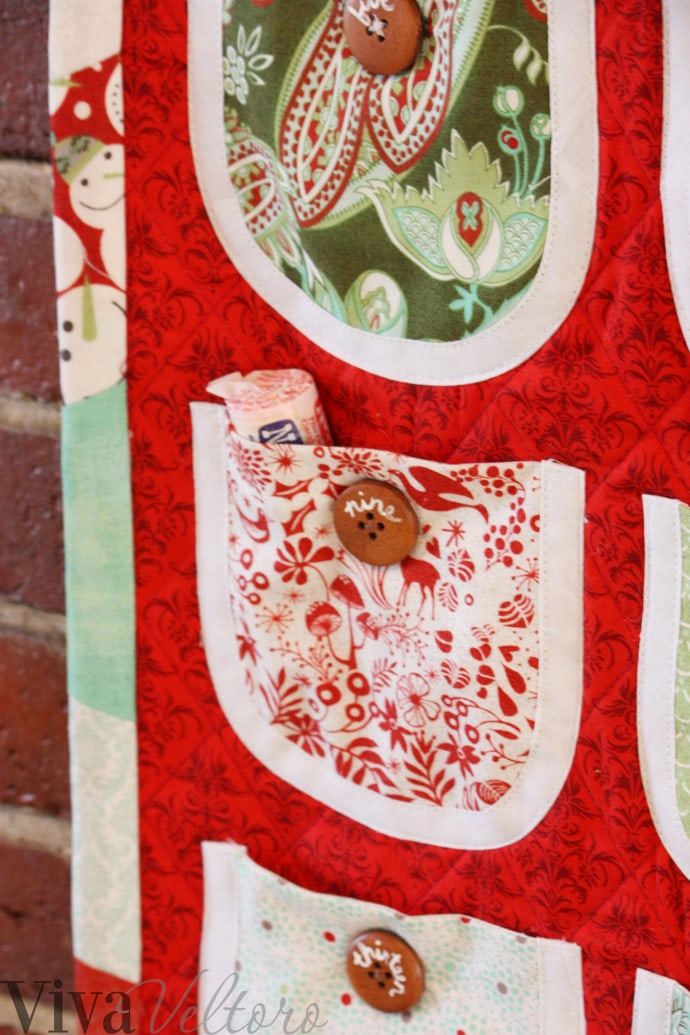
    The first step is to find an assortment of fabric scraps that you love and cut them into a pocket shape. You can make them curved like mine, standard box-shaped, or even a variety of sizes. I used pre-made double fold white bias tape to finish the edges and save me loads of time. Sew a button hole onto each pocket now. It will be impossible later!

    christmas countdown1

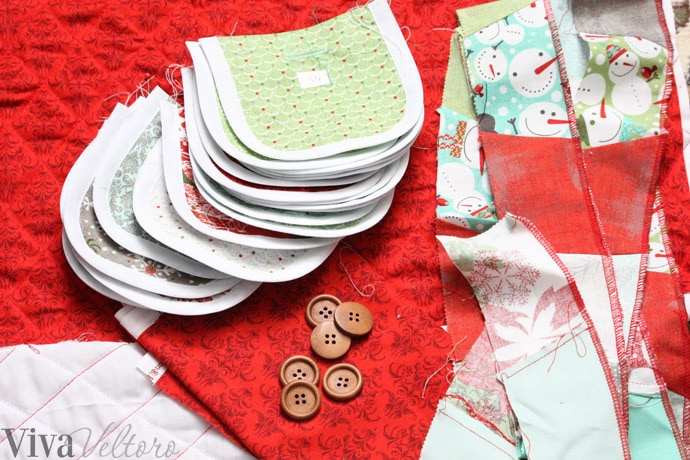
    While I was still drafting up the idea, I put a label on each pocket (ex. 1A, 2A, 3A, etc.) so that even if the pockets got out of order as I sewed them up, I'd be able to place them in the same spot I originally planned. With the same fabric scraps, I made a long strip to be the binding. Because I wasn't worried about the back looking nice, I just surged the edge instead of folding it over like a traditional binding.

    christmas countdown2

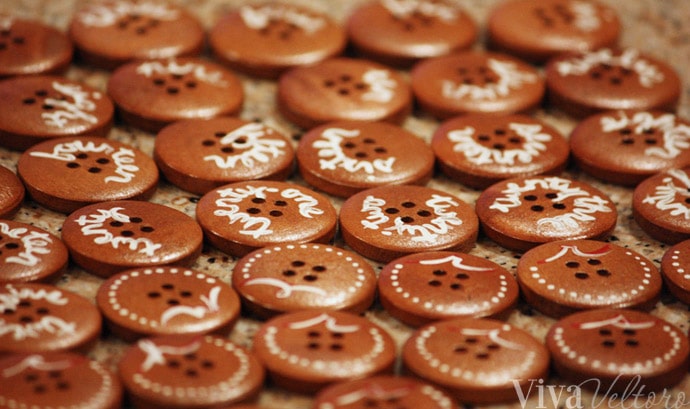
    I'm sure you could find wooden buttons anywhere, but these were an eBay steal from China sort of purchase. I think it was $2 for 50? Search for "wooden buttons" and order now so you have time to wait for the month-long shipping quote. These are 1" in diameter, and just a little acrylic paint with a light clear gloss did the trick. I really like the dark stain on these! They look like little gingerbread cookies to me!

    christmas countdown 3

    From there, I pinned the pockets in place and sewed them down along all sides of the white bias tape. I used a red damask for the base fabric, and quilted the diamond design into it with a very thin batting between this and a white back. Now you can sew the buttons on as well.

    christmas countdown 4

    Trim up the sides and sew on the binding. Again, it doesn't have to look nice on the back, so you can just wrap it around and 'stitch in the ditch'. You can see that the dimensions of this project depend on the size of your pockets and the spacing between them, but it can turn out pretty large! If you plan to put it on the back of a door, make sure its not wider than the door frame.

    christmas countdown 5

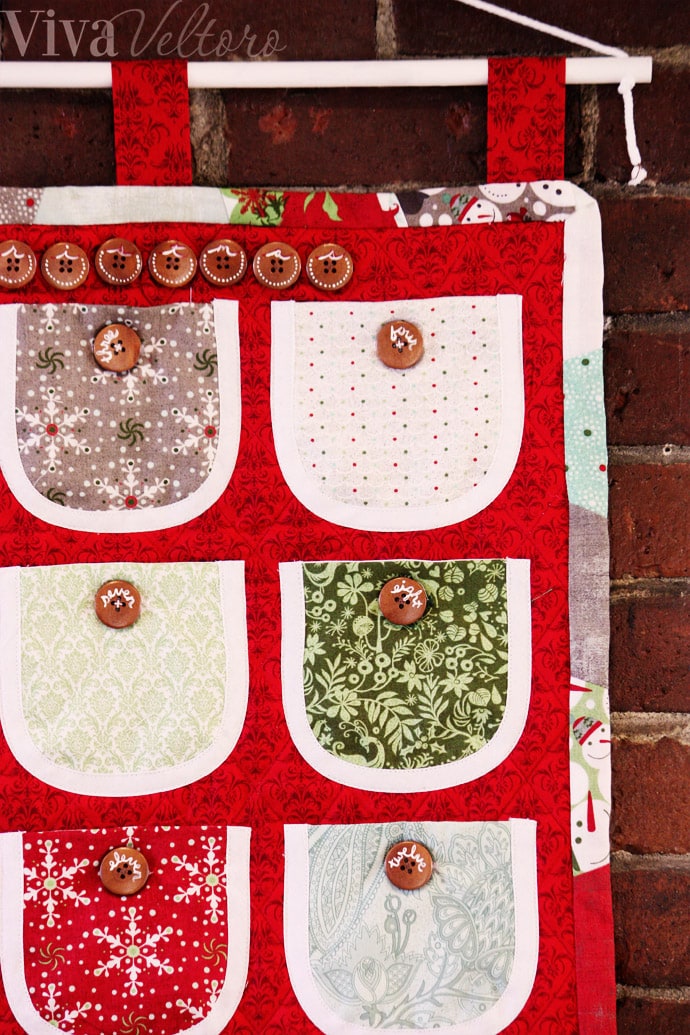
    At the top, I sewed on a few curtain-like loops and painted a dowel rode white. We drilled in two holes and strung some white cording through.

    christmas countdown 6

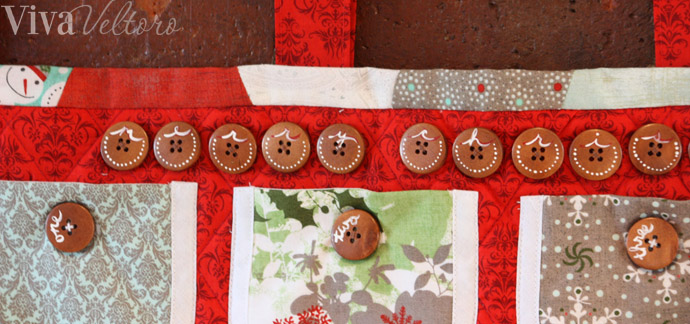
    Sew on those "Merry Christmas" buttons and you're done! Well, after you fill it with candy or other treats!

    christmas countdown 7

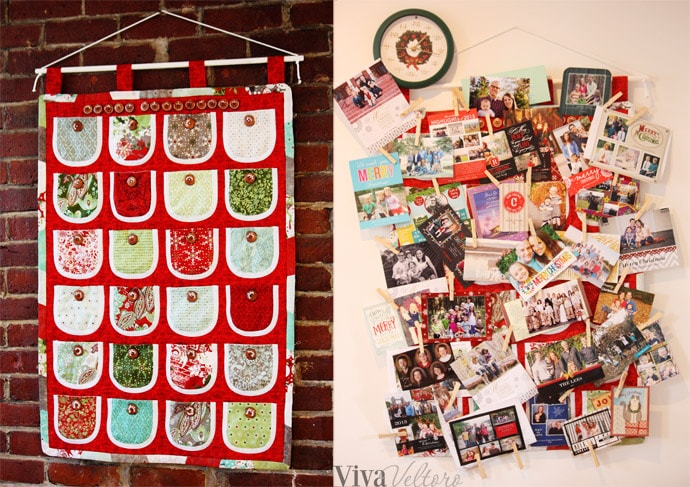
    As the candy was eaten and the Christmas cards started rolling in, I found that this was the PERFECT place to display all those beautiful cards! A clothespin held them perfectly on the rim of each pocket, and by the end of the month, it was really a beautiful sight!

    Enjoy making your own Christmas Countdown and let the festivities begin!

    Pin3
    Share
    Tweet
    Reddit
    Yum
    3 Shares
    « Awesome toy alert! Lincoln Logs The Collector Edition Homestead Review
    Dress Up your Girls in Posh Peanut! »

    Reader Interactions

    Comments

    1. Toni says

      November 03, 2014 at 6:19 am

      Loved the idea, thanks for sharing!

      Reply
    2. Angela A Simmons says

      November 03, 2014 at 12:09 pm

      How cute is that, very creative

      Reply
    3. Mare W says

      November 03, 2014 at 1:01 pm

      Cute idea and I love to sew! I've never yet serged a seam - always have done it the old-fashioned way but this would be much faster! Thank you for this lovely idea and especially with a little one, it will make it more fun to see the days go so quickly till Christmas!

      Reply
      • Camille says

        November 03, 2014 at 3:44 pm

        Plus you could make it now and fill it with all their Halloween candy!

        Reply
        • Mare W says

          November 03, 2014 at 4:34 pm

          Haha! Might get stale by Christmas so we'd better eat it now! 😉

          Reply
    4. Cheri says

      November 06, 2014 at 12:00 pm

      I have been intending (for years!) to make an advent calender...this might be the year! Thanks for the idea!

      Reply
    5. Embroiderymad says

      November 09, 2014 at 6:48 pm

      Love this idea, Thanks for the great tutorial, I love ice cream too!

      Reply

    Leave a Reply Cancel reply

    Your email address will not be published. Required fields are marked *

    Recipe Rating


    This site uses Akismet to reduce spam. Learn how your comment data is processed.

    Primary Sidebar

    Hi! I'm Ruth! I'm so glad you found me. On Viva Veltoro you'll find a little bit of everything, including fashion, beauty, parenting, recipes, DIY, products I love and places I love to go.

    Feel free to contact me at [email protected].

    More about me →

    • Facebook
    • Instagram
    • Pinterest
    • Twitter
    • YouTube

    Brunch Recipes

    • lemon ricotta stuffed french toast
      Lemon Ricotta Stuffed French Toast Recipe!
    • italian pasta salad pepperoni
      Italian Pasta Salad With Pepperoni Recipe
    • berry smoothie bowl
      Cherry, Dragon Fruit and Berry Smoothie Bowl Recipe
    • mango smoothie bowl
      Banana, Lime, and Mango Smoothie Bowl Recipe

    Hi! I'm Ruth! I'm so glad you found me. On Viva Veltoro you'll find a little bit of everything, including fashion, beauty, parenting, recipes, DIY, products I love and places I love to go.

    Feel free to contact me at [email protected].

    More about me →

    • Facebook
    • Instagram
    • Pinterest
    • Twitter
    • YouTube

    Brunch Recipes

    • easy-stuffed-french-toast
      Easy Stuffed French Toast for Kids
    • First Day of School Pancake Stacks & Best Back to School Breakfasts Ideas!
    • Fresh Cherry Cobbler Recipe!
    • Christmas Crepe Cake Recipe

    Footer

    ↑ back to top

    ABOUT VIVA VELTORO

    Viva Veltoro is a lifestyle blog, created by Florida blogger Ruth V. We focus on family, parenting, food, travel, DIY, and entertainment. Read more about the team behind the blog on our About Me page.

    Disclosure
    Cookies Info
    Privacy Policy

    COPYRIGHT

    © Ruth V. and Viva Veltoro, 2024

    We are a participant in the Amazon Services LLC Associates Program, an affiliate advertising program designed to provide a means for us to earn fees by linking to Amazon. com and affiliated sites. You can find our PR Policy and Disclosures HERE.